
Overview
While Persona provides built-in functions for manipulating data in your workflows, Custom Functions allow you to create your own functions to fill in any gaps for evaluating code. You write a JavaScript function once, publish it, and reuse it anywhere in your Workflows without copying the same logic into every step. Custom Functions are currently supported for Workflows, and the supported language is JavaScript. Functions belong to one environment: a function created in Sandbox is only available in Sandbox, and a function created in Production is only available in Production.
Once published, a Custom Function surfaces in the Workflow editor wherever the field accepts its input and output types, including action step parameters, conditional steps, and loop settings.
Functions tab and function editing window
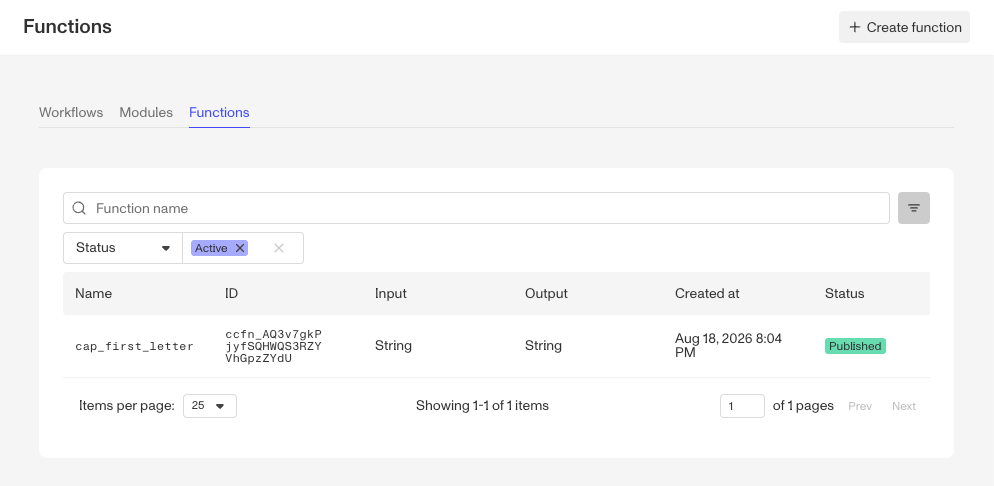
The Functions tab sits alongside Workflows and Modules, and lists the Custom Functions in the current environment. Each row shows the function’s Name, ID, Input, Output, Created at date, and Status. Use the search box and the Status and Input filters to narrow the list. From this tab you can open an existing function on its own editing page or start a new one with Create function.
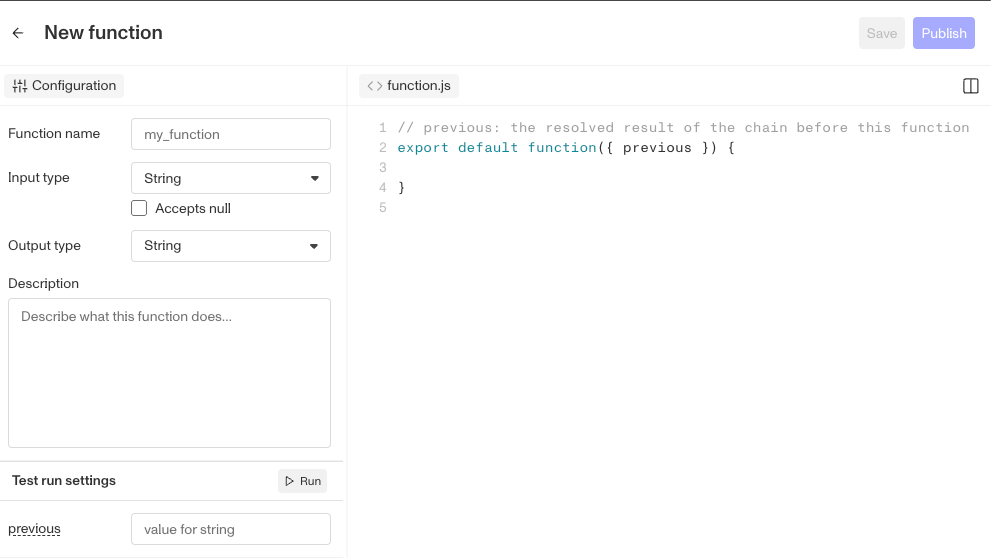
The function editor has five elements:
- Name: a short lowercase label, using letters, digits, and underscores, that identifies the function in the list and in the
@namepicker. - Input: the single input value the function receives from the caller, available in code as
previous. - Output: a single Output value the function returns.
- Code: the JavaScript that transforms the Input into the Output.
- Description: a short note explaining what the function does.
Using a Custom Function inline
Anywhere you set a dynamic value in the Workflow editor, such as an action step parameter, a conditional field, or a loop input, you can draw on a Custom Function without leaving the editor. Open the value picker for the field and build the path to the value you want to transform. Compatible Custom Functions will appear in the menu alongside the built-in options.
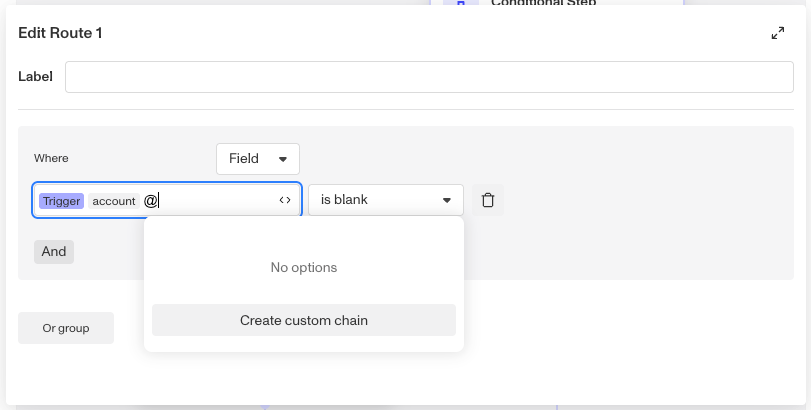
Each Custom Function appears with an @ name, such as @is_gmail_address, and selecting one appends it to the path you are building. Only functions whose input and output types fit that field are offered, and only functions from the current environment appear.
Custom Functions are created from the Functions tab, not from inside the Workflow editor: the old Create custom chain option is gone. To add a new function, go to Workflows > Functions and click Create function. The tab keeps every function in the environment in one place for review and revision.
Creating a Custom Function
- Navigate to the Functions tab in Workflows, in the environment where you want to use the function.
- Click Create function.
- Enter a Name using lowercase letters, digits, and underscores.
- Set your Input and Output types. These lock after the function is first created, so choose them carefully.
- Set a Description of your function.
- Write or paste your JavaScript in the Code editor.
- Test your function using the Test run settings section.
- Click Create to save the new function. For later edits to a saved function, use the Save button.
- When ready, use the Publish button.
You can test the function right in the editor before you publish it, so you can iterate on the code while the Input, Output, and errors are visible.
When you save a draft, the function is saved for later. When you publish it, the function becomes available to use in your Workflows and Workflow Actions in that environment.
Inputs and Outputs
A Custom Function takes a single input value, passed as the argument object to the function. The example below defines a function that receives its value under the previous key, so the code reads previous off the argument object:
// Uppercases the first character of the incoming string.
export default function ({ previous }) {
  if (typeof previous !== 'string' || previous.length === 0) {
    return '';
  }

  return previous.charAt(0).toUpperCase() + previous.slice(1);
}
The Outputs are what the function returns. The Input schema and Output schema describe the shape of the values the function accepts and returns. You define them in the function editing window, and Workflows uses them to validate the arguments you pass and the value the function produces.
Example Custom Function
Here is a complete working example of a Custom Function called cap_first_letter. It expects its Input to be a string and uppercases the first character:
// Uppercases the first character of the incoming string.
export default function ({ previous }) {
  if (typeof previous !== 'string' || previous.length === 0) {
    return '';
  }

  return previous.charAt(0).toUpperCase() + previous.slice(1);
}
Example usage: if you pass the string "hello world" as the previous Input, the function returns "Hello world". If you pass an empty string, the function returns an empty string.
Null handling for Inputs
Fields referenced in a Workflow are often blank in practice: an upstream step may not have produced a value yet, or a form field may have been left empty. Null handling controls what a Custom Function does when an Input arrives as null.
By default, null Inputs are rejected
By default, if a Custom Function receives a null Input, the function does not run. The Workflow fails with a clear error rather than a confusing JavaScript error:
Function '@my_function' does not accept null inputThis means existing functions and Workflows behave exactly as before: null handling is strictly opt-in, and a function that was written to expect a value keeps failing loudly instead of running with a null it was not written for.
Opting in with the Accepts null setting
When creating a function, check Accepts null under the Input type to declare that Input as nullable. The Input type cannot be changed after the function is created. With it on, the function receives the null and your code decides what to do, for example returning a default or passing the null through:
export default function ({ previous }) {
  if (previous === null) {
    return '';
  }

  return previous.charAt(0).toUpperCase() + previous.slice(1);
}
Nullable Inputs appear as T | null (for example String | null) in the function editor and in the Functions list, so reviewers can see at a glance which functions tolerate null. Nullability also applies to the Output: a function that can return null needs a nullable Output schema, so null never propagates as an undeclared value.
At runtime, null flows down a chain of functions: if one function returns a declared null, the next function in the chain receives it and runs only if it also accepts null. A function that does not accept null stops the run with the error above, so in a chain like @a().@b(), every function that may touch the null needs the setting enabled.
Practical guidance for builders
- Decide up front how empty data is handled. Real-world fields are often blank. Either author the function with Accepts null and handle the null branch explicitly, or leave it strict so problems surface with a clear error instead of propagating silently.
- Check the whole chain. Every function that could receive a null needs the setting enabled; one strict function in the middle stops the run.
- Test both branches. The function editor’s test panel includes a Run with null input toggle (shown only when an Input accepts null). Run your test with a typed value and with the null toggle on, in Sandbox first, before publishing.
Testing in Production vs Sandbox
You can test a Custom Function on the page while you are writing it. Once satisfied, you can save and Publish it to begin using it within your Workflows. Testing behaves differently depending on the environment:
- Sandbox: functions run with the sandbox limits in place. The sandbox catches runtime errors, missing Inputs and Outputs, and schema mismatches before you ever publish the function, which is a good reason to create and test your Custom Functions in Sandbox first.
- Production: your function receives production data. Any error the function raises also surfaces in the Workflow that runs it, so a Custom Function that works in Sandbox can still fail in Production if it was published before the code it depends on, or if the production data does not match what the Input schema expects.
Important limits
- Revisions: a Custom Function has a draft revision and a published revision. The published revision is what runs inside your Workflows and Workflow Actions. Creating a new draft does not change what is published, so a published function keeps running the behavior it had when you last published.
- Context: Custom Functions receive the context relevant to where they run. You cannot call the same function with context it was not written for.
- Environment: test in Sandbox before you publish, and verify the published revision in Production before you rely on it. Refer to the Well-Architected Workflow Framework and the client SDK guides in the Workflows developer documentation for the limits that govern the code you write.
- Availability: Custom Functions are currently rolling out, so the Functions tab may not appear in every organization yet.
Publishing and revising a Custom Function
- Click Publish on the function editing page to publish the draft as the new revision. Once published, the function is available in your Workflows and Workflow Actions in that environment.
- To revise a published function, open it and edit the code or Description. The edits create a new draft revision, and the previously published revision continues to run until you publish the new draft.
- Input and Output types lock when the function is first created and cannot be changed in a later draft. If you need different types, create a new function.
Plans Explained
Custom Functions by plan
| Startup Program | Essential Plan | Growth Plan | Enterprise Plan | |
|---|---|---|---|---|
| Custom Functions | Not Available | Not Available | Limited | Available |