
Accounts: Verification module
The Accounts Verification module is a Resource module that can be added to a Case layout. It displays all Verification attempts related to the Account. The information from the verification will be displayed in either a list or a table format.
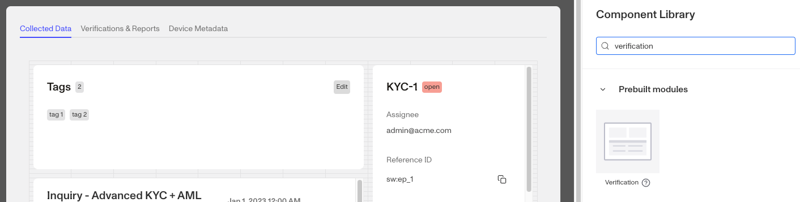
How do you add a Verification module?
This module is added and arranged on the Layout page. For a general overview of how the Layout page works, see Accounts: Layout Module.
- Navigate to the Dashboard, and click on Accounts > Types.
- Find and click on the Account Type you want to edit, or click + Create Type to create a new one.
- The Layout Editor opens with the Component Library in the right panel. Click an empty space to view the Component Library.
- In the right toolbar, search for ‘Verification.’
- Drag and drop the Verification module into your layout and reposition it by dragging it around.
- Click on the Verification module on the right toolbar you can customize how information is displayed on the module.
- Under Settings, you can set the Module title, which determines the title displayed at the top of the module.
- Under Settings, you can select a Resource, which is the query that determines which Verifications are displayed on the module.
- Under Settings, you can choose the View Type to control how Verifications are displayed, either in a Table or List format. The next setting depends on the View Type you choose:
- List view: Set the Account label, which determines the account field used as the header text for each account (for example,
business_name). Account full name is the default if nothing is filled in. If you would like to hide any empty fields from the view, click the box next to “Hide empty fields.” - Table view: Configure the Columns displayed for each Verifications. Click the ”+” to add a column, and drag the handles to reorder them. By default, the module displays Account Type, Account ID, Reference ID, Created At, and Last Updated.
- List view: Set the Account label, which determines the account field used as the header text for each account (for example,
- Under Interaction (available in Table view) you can choose the Actions to the module. Actions are one-click macros that run a pre-set Workflow automatically on the account (for example, Update fields, Update tags, or Redact). Click the ”+” to add an Action. For more, see Accounts: Module Actions.
- Under Module Layout, you can change:
- Dynamic height: Module will grow or shrink to fit its contents.
- Visibility: Dynamically control whether the module is hidden. This is a toggle button that lets you set conditions for when the button should be displayed or hidden from view based on your requirements. You can read more about [**Visibility Configuration]**(/articles/zWAAw3EplHARyOzM88Shgz/) here.
- Expand by default: Contents of the module will be expanded automatically.
- Click the “Delete” button if you want to remove the component from the layout.
Plans Explained
Accounts Verification module by plan
| Startup Program | Essential Plan | Growth Plan | Enterprise Plan | |
|---|---|---|---|---|
| Accounts Verification module | Limited | Limited | Available | Available |