
What is a schedule?
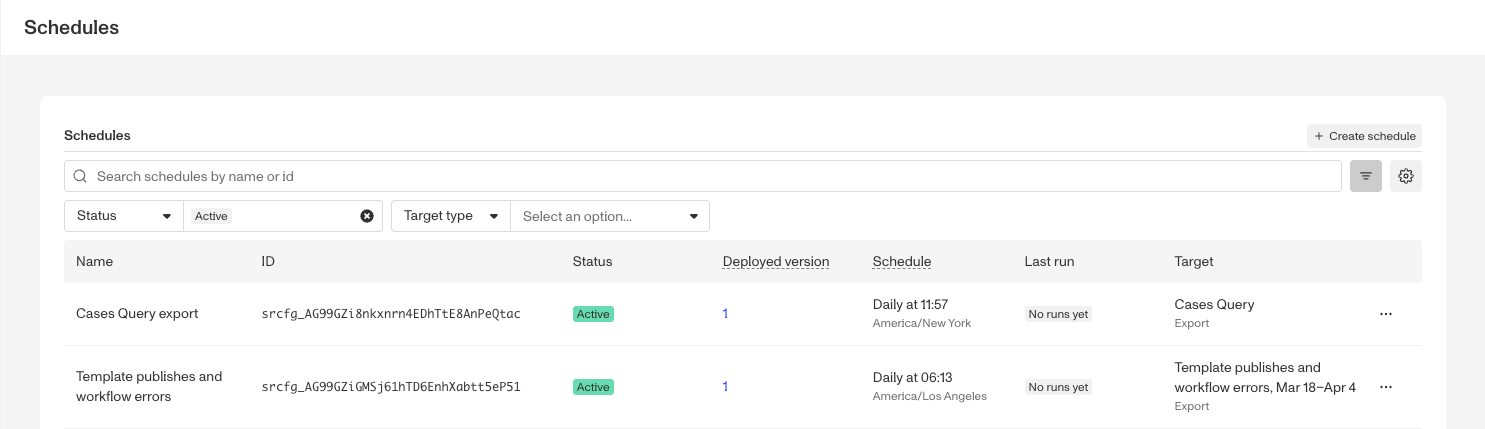
A schedule runs a Workflow, or exports the results of a saved Data Explorer query, at a time that you set. It does not wait for an event or an API call. For a Workflow, at each scheduled time, Persona finds the objects that match a filter and starts one Workflow run for each matching object.
You can use a schedule to:
- Run a Workflow one time, at a specific date and time.
- Run a Workflow again and again, on an hourly, daily, weekly, or monthly cadence.
For example, a schedule can run a Workflow every Monday at 08:10 for each Inquiry that has a specific status. Or it can run a Workflow on the 15th of each month for each Account that has a specific tag.
You manage schedules on the All Schedules page in the Dashboard, at Automation > All Schedules.
How a schedule works
A schedule has three parts:
- When it runs. One time, or on a recurring cadence, in a time zone that you select.
- What it runs. A Workflow that uses the Scheduled Workflow trigger type or an export of a saved Data Explorer query.
- Which objects it runs for. For a Workflow, a filter of one or more conditions. The Workflow runs one time for each object that matches the filter at the time of the run.
A schedule also has versions and deployments, as a Workflow does:
- When you save the settings of a schedule, you publish a version. A published version cannot change. To change a schedule, you publish a new version.
- A published version does not run until you deploy it. A schedule runs only in the environments that you deploy it to.
- In each environment, the schedule runs the Workflow version that is deployed in that environment.
Before you start
- Make sure that your role has the Schedules permissions in each environment where you work with schedules. The Admin role has both.
- View lets you see schedules, their versions, runs, and deployments in that environment.
- Edit lets you create schedules, publish versions, activate, deactivate, and delete schedules, and stop runs. To deploy a schedule to an environment, you need Edit in that environment.
- To deactivate or delete a schedule, you need Edit in each environment that it is deployed to.
- Other roles, including the default Developer and Analyst roles and custom roles, do not have the Schedules permissions. An admin must add them to the role on the Roles page. To add them, read Create, edit, or deactivate a role.
- For a Workflow schedule, you also need the Publish permission for Workflows in each environment that you deploy the schedule to. The Edit permission for Workflows is not enough.
- For an export schedule, you also need the View permission for Data Explorer in each environment that you deploy the schedule to. Without it, you cannot deploy to that environment, and the Dashboard shows “You don’t have permission to export queries in” followed by the environment name. To create an export schedule from Data Explorer itself, you also need the Edit permission for Data Explorer.
- Persona checks these permissions when you deploy a schedule. After a schedule is deployed, it keeps running even if the user who deployed it is deactivated or loses a permission.
Step 1: Create a Workflow with the Scheduled Workflow trigger
A schedule can only run a Workflow that uses the Scheduled Workflow trigger and has a published version. If the schedule runs an export, skip this step.
- In the Dashboard, go to Automation > All Workflows.
- Click Create workflow.
- For Trigger type, select Scheduled Workflow.
- For Trigger object type, select the type of object that the Workflow runs on: Account, Case, Inquiry, Report, or Transaction.
- Add the steps that you want to run for each object.
- Publish the Workflow.
For more about trigger types, read Trigger Events and Step Types in Workflows.
Step 2: Create the schedule
-
In the Dashboard, go to Automation > All Schedules.
-
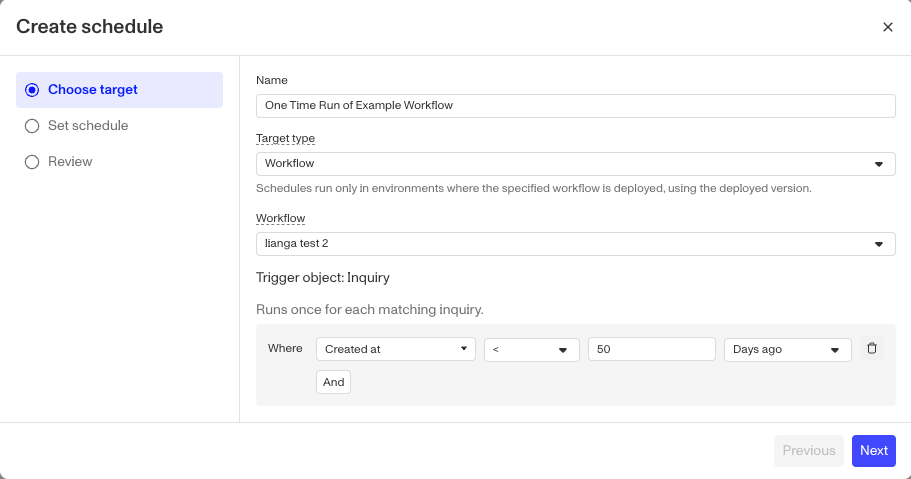
Click Create schedule. The Create schedule dialog opens. It has three steps: Choose target, Set schedule, and Review.
-
In Choose target, type a Name for the schedule.
-
For Target type, select Workflow or Export. You cannot change the target type after you publish the schedule.
-
Set the input for the target:
- For Workflow, select the Workflow in the Workflow list. The list shows only Workflows that use the Scheduled Workflow trigger and have a published version. A new schedule starts with one condition, Created at > 1 day ago. Change it or click And to add more conditions, and set the Field, Operator, and Value for each. A schedule must have at least one condition.
- For Export, select a Saved query from Data Explorer. You cannot select a query that uses variables or tables with personal data, or a query that already has an export schedule. Then, in Recipients, select the people who get an email for each run. You can select up to 25 people. You are added by default. Recipients must be active users in your organization. You cannot add other email addresses. Recipients do not need the Schedules permissions. Each recipient needs the View permission for Data Explorer. If a recipient does not have this permission, you cannot save, and the Dashboard shows the names of the recipients who do not have access. A recipient gets the email for a run only if they have this permission in the environment of that run. If you remove all recipients, no email is sent, and each export is still in the run history.
-
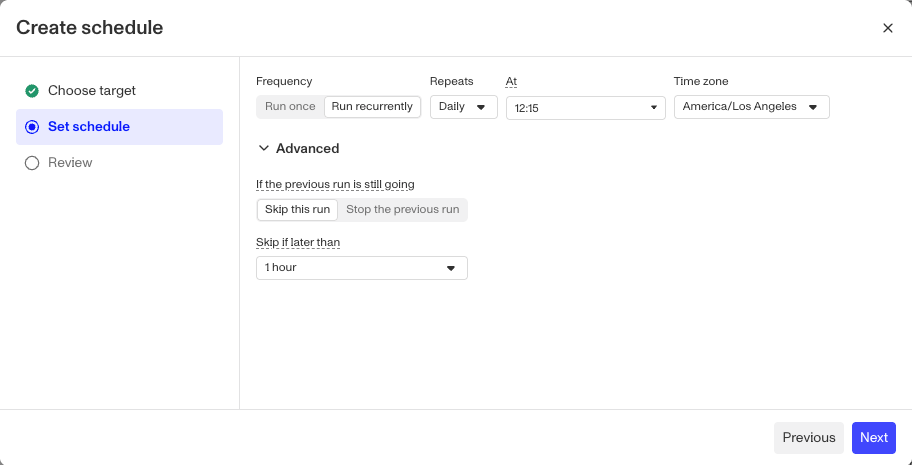
Go to Set schedule. For Frequency, select Run once or Run recurrently.
- For Run once, set the Date and time and the Time zone.
- For Run recurrently, set Repeats, the time of the run, and the Time zone. The section “Schedule options” below gives the options for each cadence.
-
(Optional) Click Advanced to change what happens when runs overlap or start late. The section “Advanced options” below explains each setting.
-
Go to Review. Check the name, the schedule, the target, and for an export, the recipients. (Optional) Type a Description for this version.
-
Click Publish.
The schedule now has its first version. Publishing does not start a run. The Deploy schedule dialog opens next.
Each run of an export schedule emails a download link, not an attachment, to the recipients of the version that ran. The export is also kept in the run history. If a recipient is later deactivated or loses access to Data Explorer, they stop getting emails, and the schedule keeps running. For an existing export schedule, a new version can change the timing and the recipients. The saved query cannot change. Each run uses the latest version of the query.
Step 3: Deploy the schedule
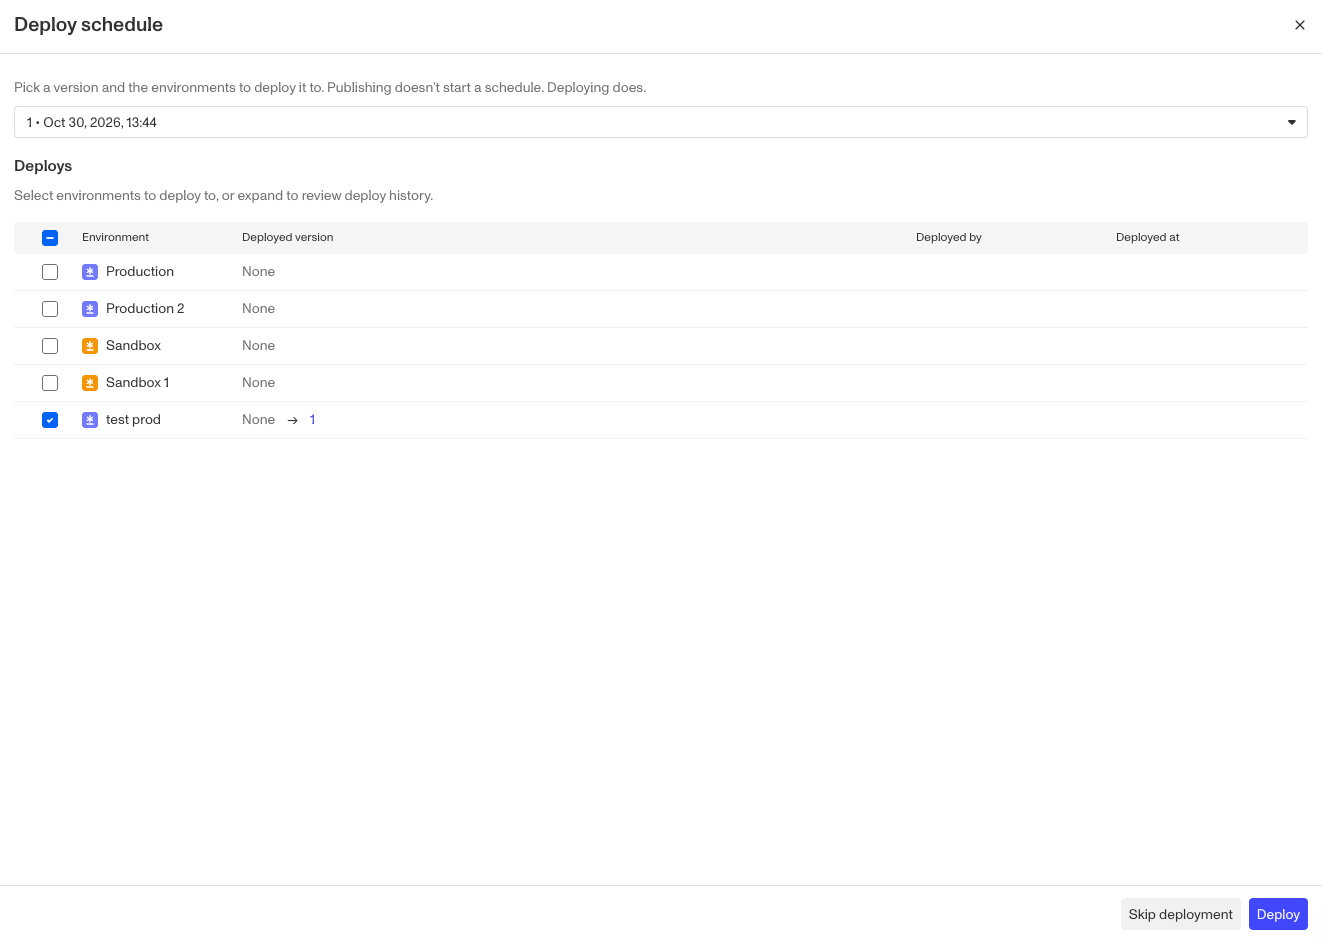
After you publish a version, the Deploy schedule dialog opens.
- In Version to deploy, keep the version that you published, or select a different published version.
- Under Deploys, select the environments that you want the schedule to run in.
- Click Deploy.
To deploy later, click Skip deployment. The schedule page opens. When you are ready, click Deploy on the schedule page.
If you deploy to more than one environment at the same time, the deploy succeeds in all of them or changes none of them.
Schedule options
The Frequency of a schedule is set by its first version. You cannot change a run-once schedule to a recurring schedule, or a recurring schedule to a run-once schedule. To change the frequency, create a different schedule. You cannot change the target type of a schedule. For a Workflow schedule, a new version can select a different Workflow. For an export schedule, the saved query cannot change.
Run once
A run-once schedule runs one time for each version, when you deploy that version. Publishing a version does not run it.
- If the date and time are in the future, the run starts at that time.
- If the date and time are in the past, the run starts when you deploy the version. If the time is earlier than the Skip if later than setting allows, the schedule cannot be published.
- To run the same settings again, open the version and click Duplicate to new version, then publish and deploy the copy.
Run recurrently
| Repeats | Every | You also set |
|---|---|---|
| Hourly | 1, 2, 3, 4, 6, 8, or 12 hours | The minute past the hour, and for more than 1 hour, the starting hour |
| Daily | 1 day | The time of day |
| Weekly | 1 week | The day of the week and the time of day |
| Monthly | 1, 2, 3, 4, or 6 months | The day of the month (the 1st to the 31st, or Last day of the month), the time of day, and for more than 1 month, the starting month |
Some things to know about recurring schedules:
- An export schedule can run at most once a day. For an export, select Daily, Weekly, or Monthly. Hourly is not available.
- If you select a day of the month that a month does not have, such as the 31st, the schedule does not run in that month. It does not move the run to the last day of the month. To run on the last day of every month, select Last day of the month. This option uses the real last day of each month, including 28 or 29 February.
- The time zone applies to the date and time that you set. Persona supplies a list of common time zones, including UTC.
- Times on the hour, midnight, and the 1st of the month are the most common choices. Runs at those times compete with more runs. A time a few minutes past the hour, such as 09:10, usually starts sooner.
Advanced options
| Setting | What it does |
|---|---|
| If the previous run is still going | Recurring schedules only. Select Skip this run (the default) or Stop the previous run. Only one run is in progress at a time. A skipped run does not show in the run history. |
| Skip if later than | If a run cannot start on time, it still starts if the delay is not longer than this value. If the delay is longer, Persona skips the run. For a recurring schedule, the next run is not affected. You can select 15 minutes, 1 hour, 6 hours, 1 day, 1 week, 1 month, or 1 year. The default is 1 day for hourly schedules, 1 week for daily, 1 month for weekly, and 1 year for monthly and run-once schedules. |
Each run of a recurring schedule starts a short time after the scheduled time, not exactly at it: within 5 minutes for hourly schedules, 15 minutes for daily, 30 minutes for weekly, and 1 hour for monthly. You cannot change this. A run-once schedule starts at the scheduled time.
Managing a schedule
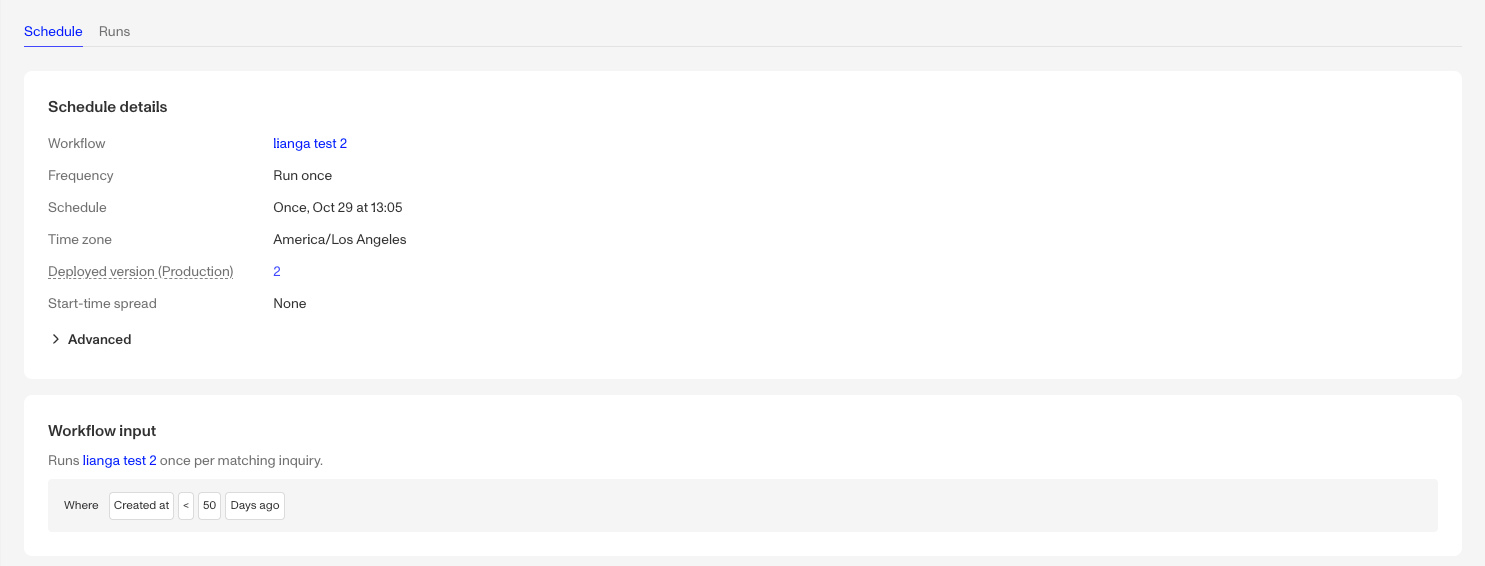
Open a schedule from the All Schedules page. The schedule page has two tabs:
- Schedule shows the settings of the schedule and what it runs.
- Runs shows the upcoming runs and the past runs. Each run shows the time it was scheduled for, when it started and finished (with the time zone), its status, and the version it came from.
Each past run has a menu:
- View workflow runs (Workflow schedules) opens the Workflow runs that the run started.
- View export (export schedules) opens the export that the run made.
- View stats (Workflow schedules) opens the Run stats window when the run has totals. It shows how many objects matched and how many Workflow runs started, were skipped, completed, failed, or have an unknown result. A run that ends with an error shows the totals up to the error.
- Cancel run cancels a run that has not started. Stop run stops a run that is in progress. Stopping is best effort. Work that the run already started can finish, and work outside Persona might not stop.
Runs skipped counts the objects that Persona did not start a Workflow run for. This happens when an object already has a run of that Workflow in progress, when an object no longer exists, or when your organization reaches its Workflow run limit. When the limit is reached, the schedule stops starting runs, and the run still finishes. It is not counted as failed. A schedule run never starts more than one Workflow run for the same object.
If a run cannot start the Workflow, the status of the run is Errored. The run shows the reason and what to do. For example, the Workflow has no version deployed in that environment, the Workflow is paused or archived, or the filter is no longer valid. After you fix the problem, the next run uses the fix. You do not need to change the schedule.
At the top of the schedule page, you can:
- Click Edit to publish a new version, then deploy it. Runs that already started continue on the version that they started on.
- Click Deploy to open the Deploy schedule dialog and deploy a version.
- Click Activate to make an inactive schedule active again. It does not run until you deploy a version.
The More schedule actions menu has these actions:
- Version history shows the versions of the schedule.
- Manage deployments opens the Deploy schedule dialog, where you can see the deploy history of each environment and change which version is deployed.
- Deactivate an active schedule. The schedule becomes Inactive. It stops running in every environment, not only the one that you are viewing, and runs that are waiting to start are canceled. The schedule is undeployed from every environment. Its versions and run history are kept. To start it again, click Activate, then deploy a version to each environment where you want it to run. Activating a schedule does not deploy it. Runs that were canceled do not come back.
- Delete a schedule. The schedule is removed from the Dashboard in every environment, and it is undeployed from each environment. You cannot undo this.
On the All Schedules page, the menu of each schedule has Deactivate (or Activate for an inactive schedule), Edit, and Delete.
The status of a schedule is Active or Inactive. Next to the status, the schedule page shows Deployed if a version is deployed in the environment that you are viewing, or Published if no version is deployed there. An inactive schedule shows Published, because deactivating a schedule undeploys it.
Deleting a schedule cannot be undone. To stop runs for a while, deactivate the schedule instead. To start it again, activate it and deploy it.
Limits
- An organization can have up to 100 active recurring schedules.
- A Workflow schedule runs for objects of one type: Account, Case, Inquiry, Report, or Transaction.
- A Workflow schedule must have at least one filter condition.
- Filters can use only the built-in fields of the object type, such as status, template, tags, reference ID, and dates. You cannot filter on custom fields from an Inquiry template or Account type, or on the fields of a linked record. The exceptions are the Account of an Inquiry and the assignee of a Case, which you can filter on.
- A saved query can have only one active export schedule.
- You cannot add variables to a saved query that an active export schedule uses.
Schedules and Recurring Workflows
Schedules replace the Recurring Workflow trigger. Each active Recurring Workflow was moved to a schedule that runs a Workflow with the Scheduled Workflow trigger. Its timing, filter, and object type were carried over, and its past run history is kept. The old Recurring Workflow is paused and read-only, and Recurring is no longer a trigger option. To change one of these schedules, go to Automation > All Schedules.
Schedules and the Schedule Workflow step
Schedules and the Schedule Workflow step both start a Workflow that uses the Scheduled Workflow trigger, but they do different jobs:
- Use a schedule to run a Workflow at a fixed time or cadence, for all objects that match a filter.
- Use the Schedule Workflow step to start a Workflow for one object, at a time relative to another Workflow run or to a date on that object, such as an ID expiration date.