
Overview
Extraction Configurations on Document Verification Templates define how Document AI identifies and extracts textual information from documents. Extracted data can be automatically compared against Inquiry fields when a Document Verification is run within an Inquiry. For example, if the name of an individual is known and stored on an Inquiry field, then you can configure a Document Verification Template’s extraction configurations to compare extracted name(s) from a Document against those Inquiry fields while a user is going through an Inquiry.
These configurations enable you to standardize extraction logic, apply automated comparison checks, and enrich verification results with structured data for further analysis across Persona products like Workflows, Cases, and API responses.
Configuring Extractions
-
Navigate to the Dashboard, and click on Inquiries > Templates (or Verifications > Templates).
-
Find and select an Inquiry template with Document AI, or Create a new template.
-
In the left panel, click Verifications.
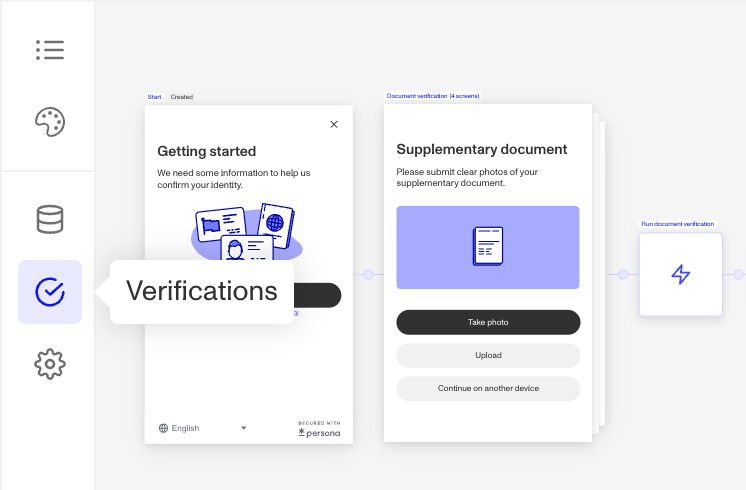
-
In the left navigation, click Document Groups, and select the document group you wish to configure. (Learn more about document groups in this article.)
-
In the document group configuration panel, click on Extractions.
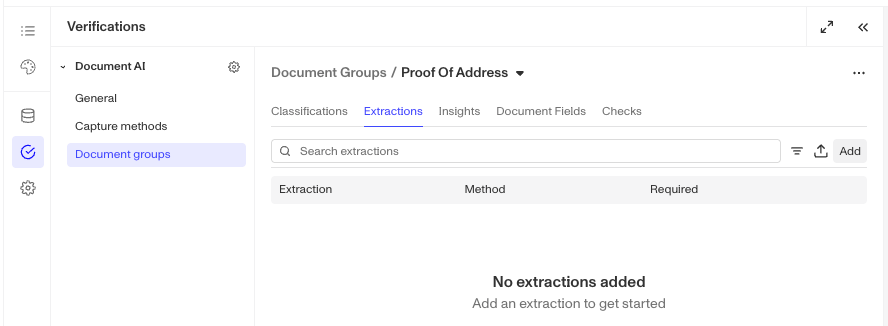
— the Add control is now a dropdown, described in the next step.
-
Click the Add dropdown and choose an extraction source:
- Custom extraction: Opens the configuration panel described below to build a new extraction from scratch.
- Persona managed extraction: Opens the Extraction Library, a set of Persona-managed, pre-built extraction presets you can add without configuring one manually.
-
If you chose Custom extraction, fill out the following fields in the right panel:
- Label (required): A concise and descriptive label or name for the extraction that can provide context to the AI about what you wish to extract. Note that extraction labels should focus on the properties of the text itself, rather than on any visual characteristics such as formatting or imagery.
- Key (required): Auto-generated from the label. Used in API responses and across Persona products.
- Required extraction: When selected, the verification will fail if this extraction cannot be found in the document.
-
Under Method, choose how to extract the data:
- Inquiry Comparison: Extract data from a document and compare it against Inquiry field values. See Configure Inquiry comparison below for comparison fields.
- AI Extraction: Extract values from the document using Document AI. Use the optional prompt to provide more context, and select an Output format: Text for an individual value or Structured Data for related or repeating values. See Configure structured extractions below for schema setup.
-
Under Advanced, choose if you want to “Save to Document Field.”
-
Click Save on the top right to save all changes to your template.
Vision Mode for extractions
By default, Document AI uses OCR to read text from a document, then uses that text to produce extraction results. Vision Mode instead passes the document image or file directly to the AI model, allowing it to consider the document’s visual layout as well as its text.
Consider Vision Mode for non-English documents or complex layouts, such as Chinese business licenses, when extraction quality matters more than response time. It may help with these documents, but results depend on the document and the fields being extracted. Vision Mode typically increases median (p50) processing latency by 2 to 5 seconds, and individual documents can vary, so it is better suited to workflows that can tolerate a slower response than to latency-sensitive decisions.
Vision Mode is part of the Enhanced Document Verification SKU and is configured for individual AI-type extractions, rather than for an entire document group by default. If you want to enable it, contact your Persona account team to discuss your use case and the extractions you want to use it with.
Configure structured extractions
Use Text output for a single value that does not need a defined relationship to other values. Use Structured Data when you need a schema for related fields or repeated records, such as several beneficial owners named in one document. The schema defines the expected shape of the extraction; it does not independently verify the document’s contents or guarantee that every value is correct.
- Add a Custom extraction to the relevant document group, then give it a descriptive Label and review its generated Key.
- Under Method, select AI Extraction. Under Output format, select Structured Data.
- Select Edit Schema in the JSON Schema section. In Builder, add properties and choose their types. Use an Object to keep related properties together and an Array when the document may contain multiple records of the same type. You can also use Code to edit the JSON Schema directly.
- Give each property a meaningful, snake_case key, such as
ownership_percentage. Add a description when a field needs more context about what to extract. Save the schema in the editor, then click Save on the template.
For example, open Edit Schema, switch to Code, and replace the editor contents with this JSON Schema configuration. It describes the fields to look for; it is not an example of the values returned from a document.
{
  "schema": {
    "type": "object",
    "title": "Beneficial owners",
    "properties": {
      "owners": {
        "type": "array",
        "description": "Beneficial owners listed in the document",
        "items": {
          "type": "object",
          "properties": {
            "name": {
              "type": "string",
              "description": "The owner's full name"
            },
            "title": {
              "type": "string",
              "description": "The owner's role or title"
            },
            "ownership_percentage": {
              "type": "number",
              "description": "The owner's ownership percentage as a number"
            }
          }
        }
      }
    }
  }
}
Adjust the names, descriptions, and types to match the information in your documents. The owners list keeps each person’s name, title, and ownership percentage together. If you expect only one set of related fields, use an object instead of an array.
After a Document Verification runs, review its extraction results against the submitted document before relying on them downstream. Structured extraction responses can include nested results as well as individual extracted values; do not assume that saving to a single Document Field preserves the entire nested structure. For Document Field configuration, see Document AI: Document Fields Configurations.
Configure Inquiry comparison
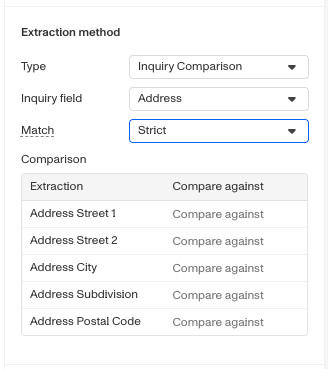
If you selected Inquiry Comparison as your extraction method, you will need to configure how extracted extract data will be compared against Inquiry field values.
- Inquiry field: Choose the Inquiry field you want the extracted data to be compared against.
- Composite Inquiry Fields: Use these to compare extracted data to specific Inquiry fields that may be a hash data type or have multiple components. This is also useful if you’d like to have custom mappings of what fields to compare. Examples:
- Address: Map Document extracted data to the desired address fields on the associated Inquiry template (such as Street 1, Street 2, City, Subdivision, Postal Code) that you’d like to holistically compare document extracted values to.
- Name: Map Document extracted data to the desired fields on the associated Inquiry template (such as First Name, Last Name) that you’d like to holistically compare document extracted values to..
- Single Inquiry Fields: Use these to compare extracted data to one specific Inquiry field. This is useful is useful if you’d like to have strict 1-to-1 comparisons or for documents that may have less complex data. Examples:
- Name First: Compare the extracted first name from the document to the Inquiry’s first name field.
- Name Middle: Compare the extracted middle name to the Inquiry’s middle name field, when applicable.
- Name Last: Compare the extracted last name to the Inquiry’s last name field.
- Composite Inquiry Fields: Use these to compare extracted data to specific Inquiry fields that may be a hash data type or have multiple components. This is also useful if you’d like to have custom mappings of what fields to compare. Examples:
- Match requirement: Define how closely the extracted data must match the Inquiry field value.
- Loose: Uses AI-based text matching to account for common formatting or spelling variations. (e.g., “St” vs “Street”).
- Strict: Requires higher precision in matching specific field components.
- Address/Name extraction details (if applicable):
When you select a Composite Inquiry Field, an additional section will appear where you can specify which components of the field should be extracted and compared.
Extraction Library
The Extraction Library is a set of Persona-managed, pre-built extractions — such as names, addresses, dates, tax IDs, and business or statement fields — that you can add to a document group without writing or configuring the extraction logic yourself.
The library includes:
- Document-specific extractions optimized for supported document types.
- Document-agnostic extractions designed to work across different document types.
To add library extractions:
- From the Add dropdown, select Persona managed extraction to open the Extraction Library.
- Search for an extraction or filter the library by document type. Extractions optimized for the document types already configured in your document group appear first, followed by document-agnostic options.
- Select one or more extractions — the modal supports multi-select — and add them to your document group.
Extractions added from the library use prompts managed and tested by Persona. Persona continually adds new extractions and optimizes existing prompts for its latest default AI models. Because library extractions remain linked to the library, they automatically benefit from future prompt improvements without requiring you to update the configuration manually.
If your use case requires specialized instructions that aren’t available in the library, create a Custom extraction instead.
Why Extraction Configurations are important
Extraction Configurations enable you to automate how Document AI identifies and interprets document data. By configuring extractions, you can ensure that key details, like names, dates, and addresses, are consistently captured and later validated against trusted sources using the rest of the Persona platform or the Inquiry field comparison.
They’re especially useful when you need to:
- Automate comparisons between submitted documents and Inquiry fields.
- Capture and standardize text values for use across Workflows, Cases, and APIs.
- Enrich your Verification data with structured, machine-readable fields
Plans Explained
We’re here to chat through your specific needs. Feel free to reach out to your Customer Success Manager or contact the Persona support team.
Extraction Configuration by plan
| Startup Program | Essential Plan | Growth Plan | Enterprise Plan | |
|---|---|---|---|---|
| Extraction Configuration | Not Available | Limited | Available | Available |