
Confirmation Use Case
Occasionally our customers want their end users to be able to confirm if the information extracted from a Gov ID is correct. For example, with long names on passports the format limitations of the Machine Readable Zone (MRZ) might lead to their full first name being shortened in the MRZ. Having a confirmation screen where the end user can flag the incorrect name and provide the correct name, allows corrections to be flagged for manual review.
This guide covers two ways to modify an inquiry flow with a confirmation screen without affecting verification results.
Goals
Create a confirmation page that will:
- Display extracted PII
- Allow end users to flag the PII as incorrect
- Allow end users to input the correct PII
- Preserve extracted PII
This walkthrough uses the Checkbox component within the new screen, and the Checkbox component is an Enhanced feature. Unlocking the Enhanced features of an Inquiry template add $100/month charge for that individual template.
Starting Point - Gov ID (front side) Solution
For this walkthrough our shared starting point is the Gov ID (front side) solution. We’ll be making some quick additions to this solution in the form of 1 new confirmation screen step and 1 branching logic step.
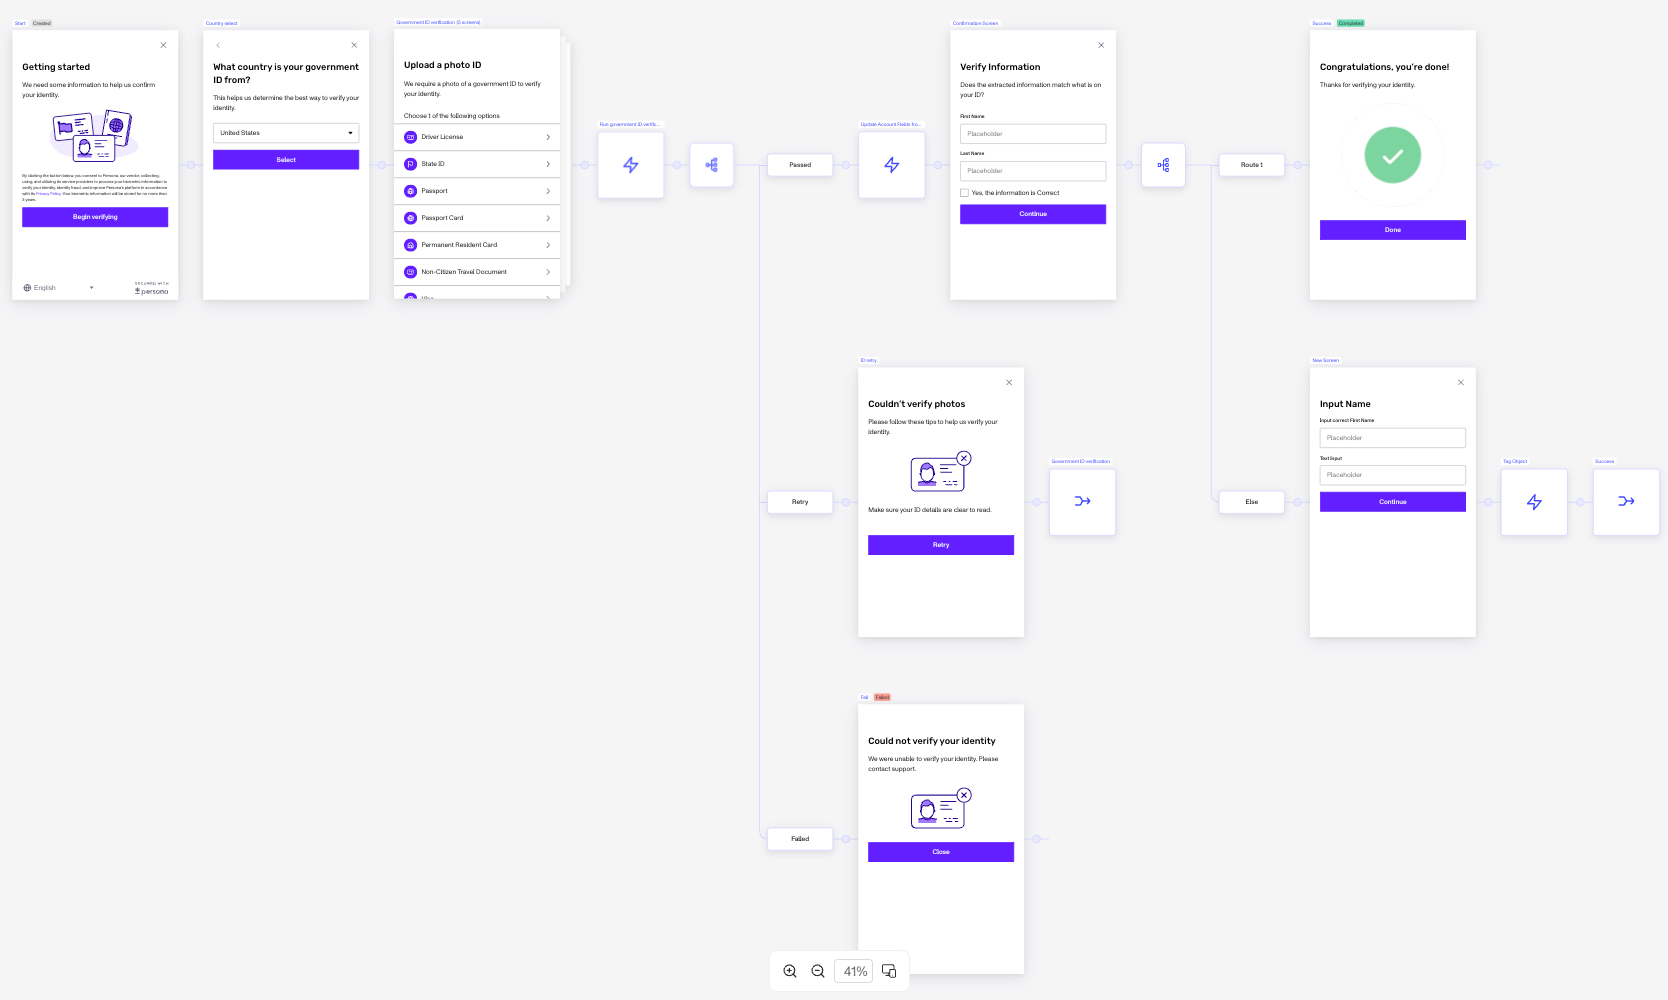
Creating the new Screen
By the end you’ll have a new confirmation screen that will ask the end user if their extracted first and last names are correct. If incorrect, it will provide fields to input the corrected versions.
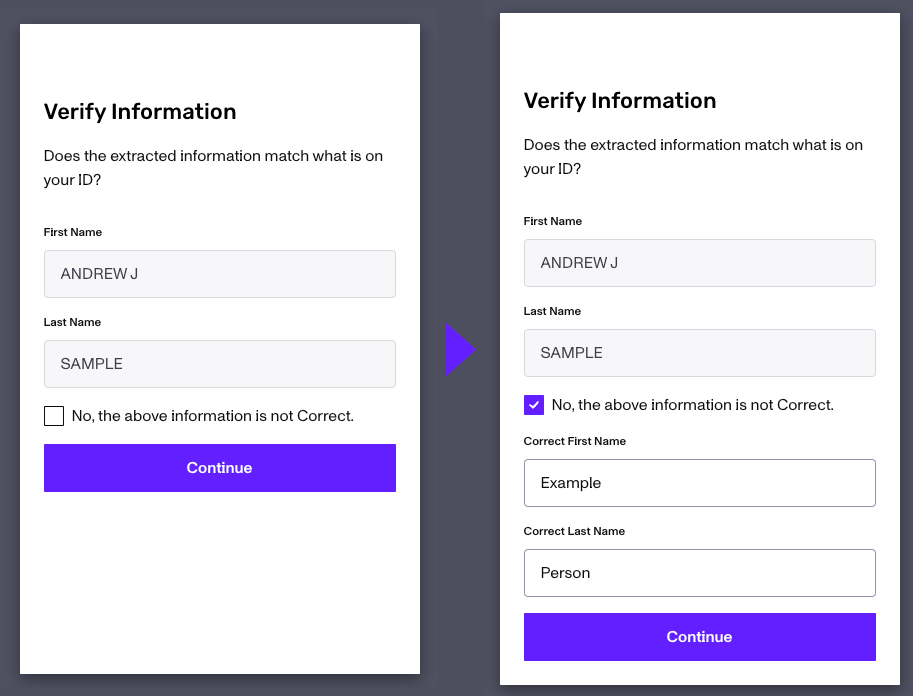
Steps
-
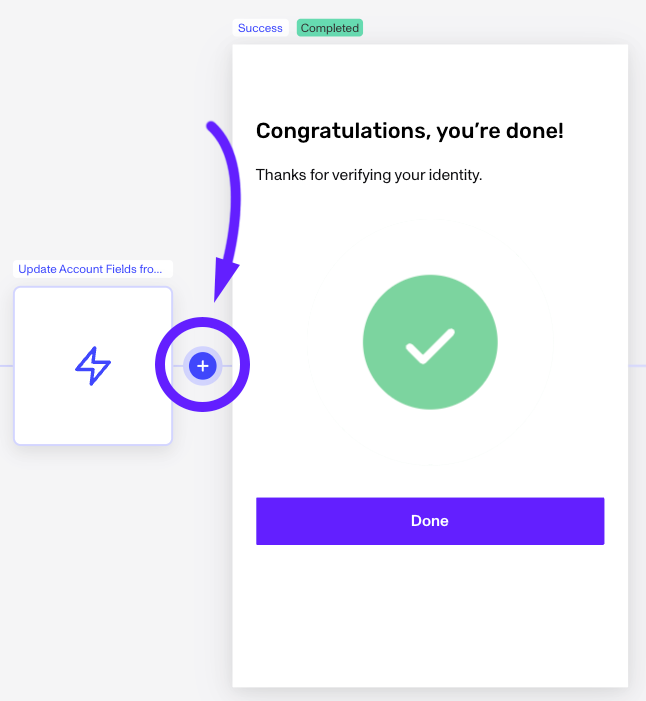
Add new Step. Click the Add Step node button in between the Update Account Fields step and the Success screen.
-
From the available Steps, select Screen.
-
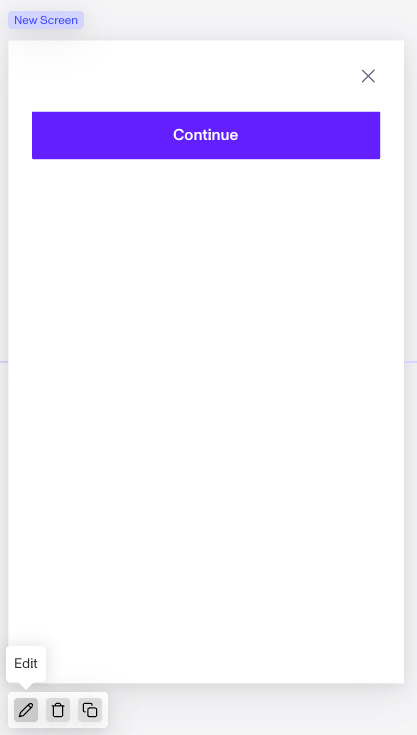
A new Screen will be populated. Mouse over it and when the Edit button appears at the bottom left, click it.
-
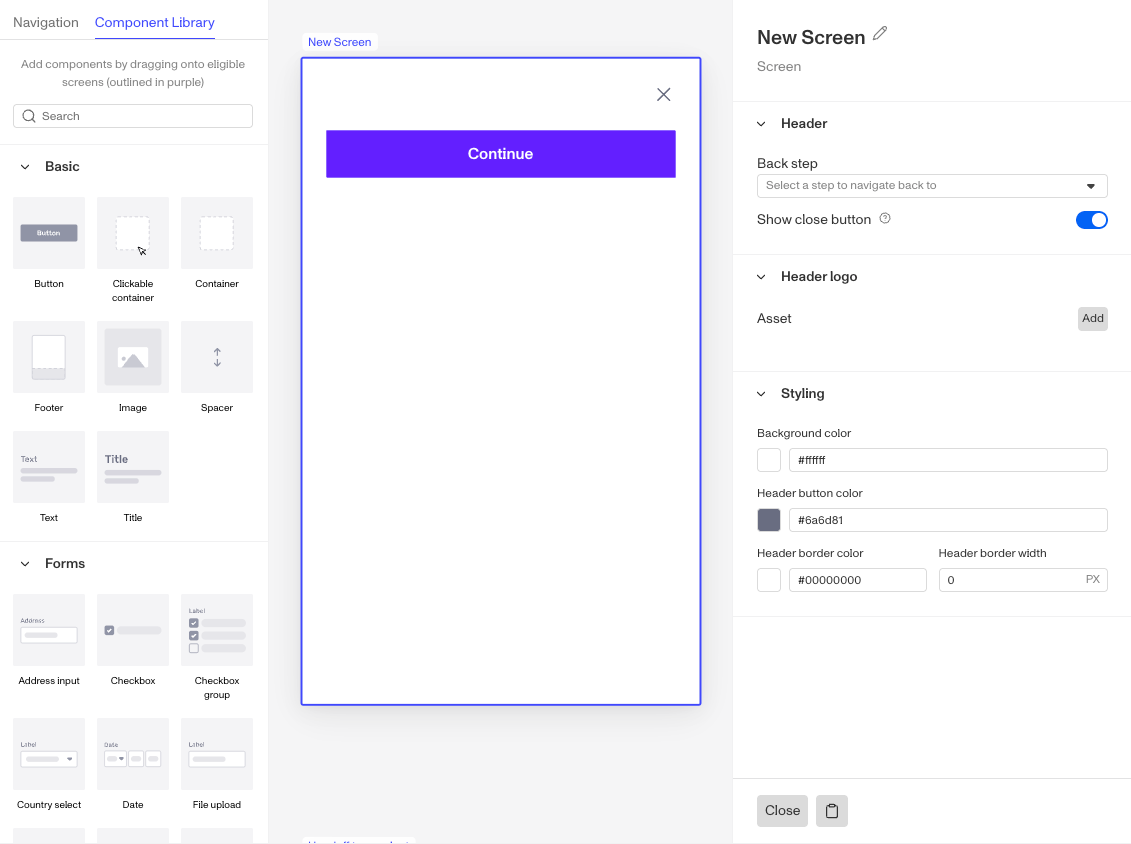
This will open the Screen Editor. At the top right, where is says New Screen, hover over the name and then click the Edit icon and rename the screen to something more descriptive like “Name Confirmation”.
-
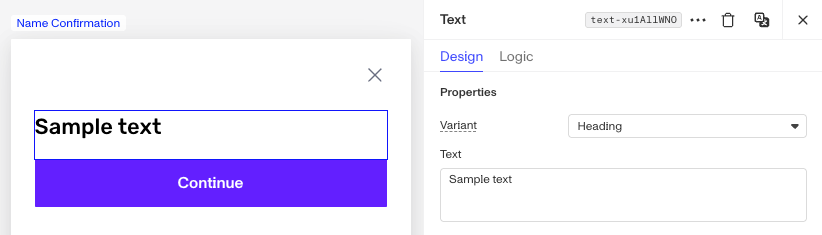
On the left is the Component Library. In the Elements section, note the Text component. Click and drag out the Text component and place it above the Continue button. In the right panel Design tag, switch the Variant from “Body” to “Header”.
-
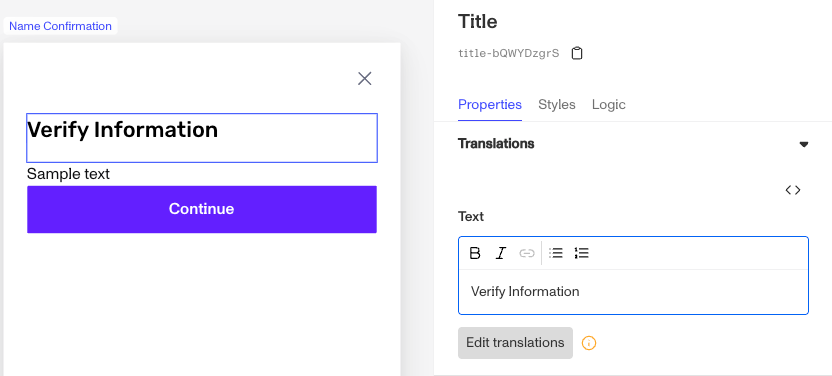
Update the text header to “Verify Information”.
-
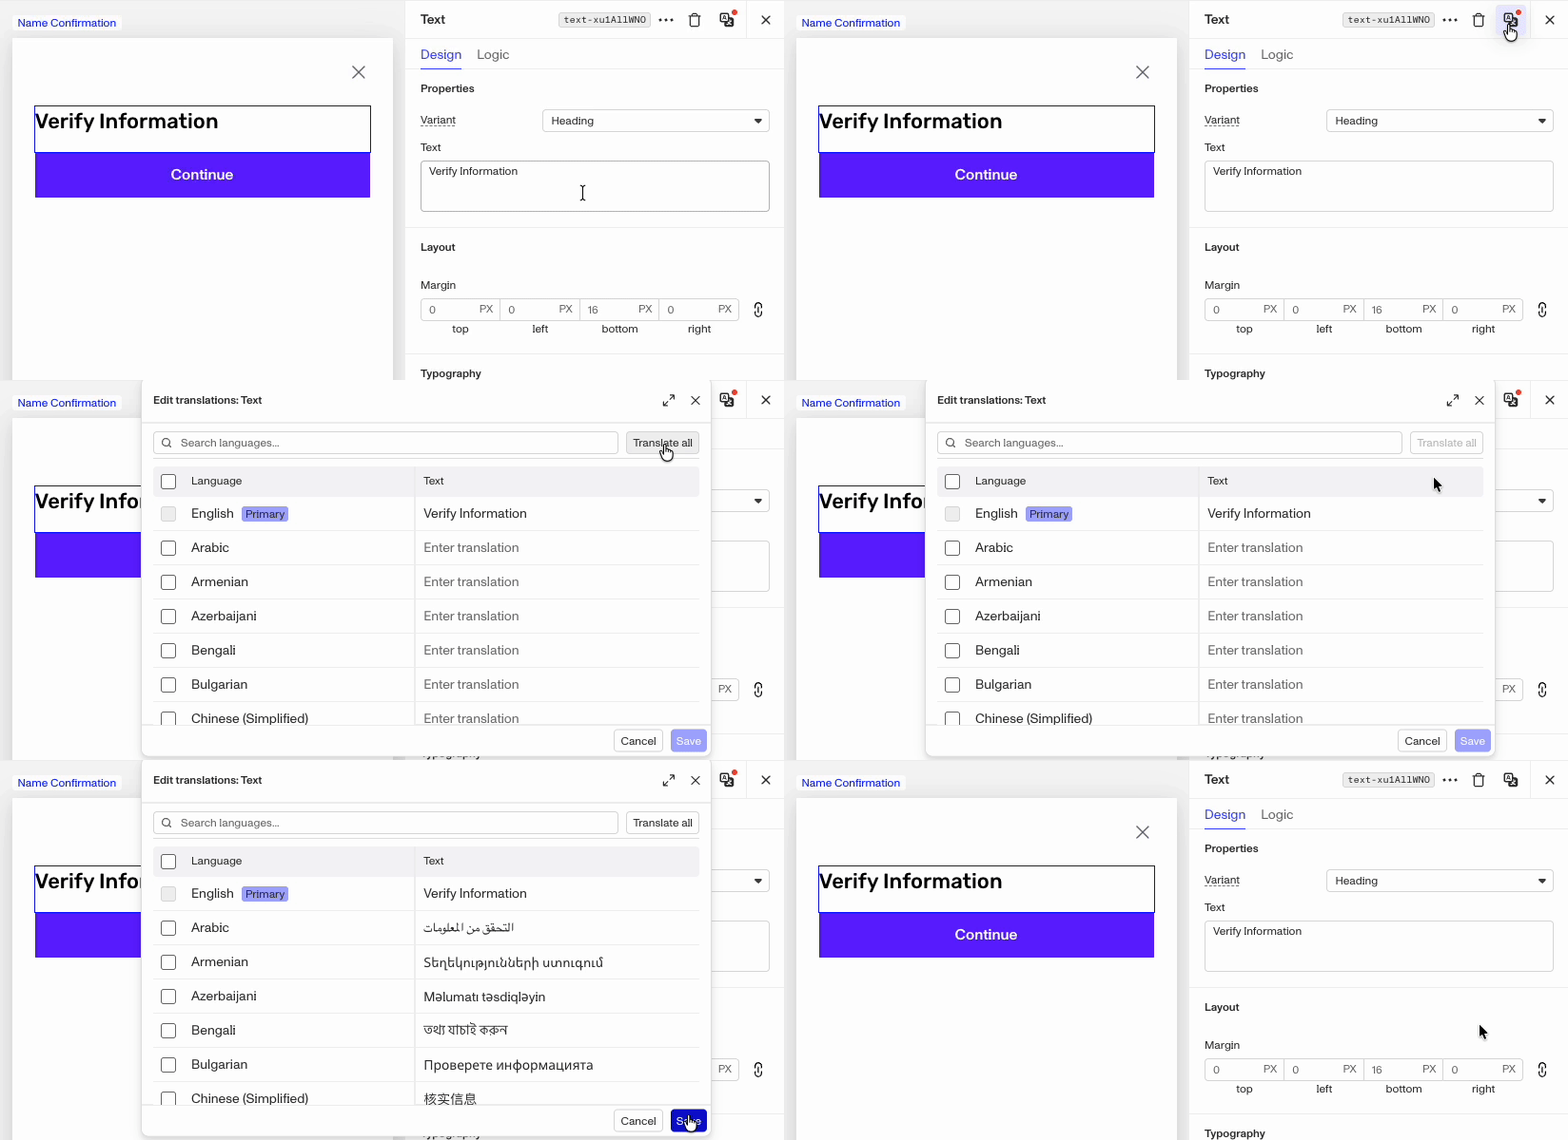
Note that any time you modify a text field, the Edit translations button at the top right will flag an alert. Click the Translations button. Within the widget, you can manually update the text in a variety of languages. You can also select all languages or select specific supported languages to be auto-translated.
-
Repeat steps 6 & 7 with a Text component between the Header and Continue button. Enter a message / instruction to your end users like “Does the extracted information match what is on your ID?”. The question you ask should reflect your specific use case. In the use case of a Passport MRZ shortening the first name, the question might be “Is your first name longer than what is displayed?”.
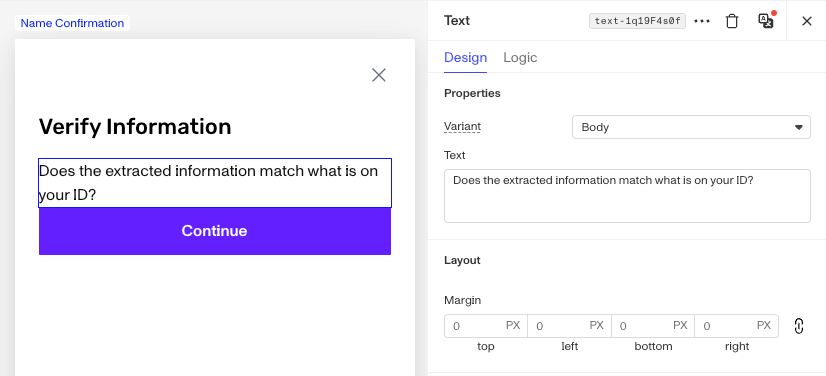
-
To display the extracted PII from the Gov ID, we’ll go back to the Component Library and search for “text”. Drag two Text Input components above the Continue button.
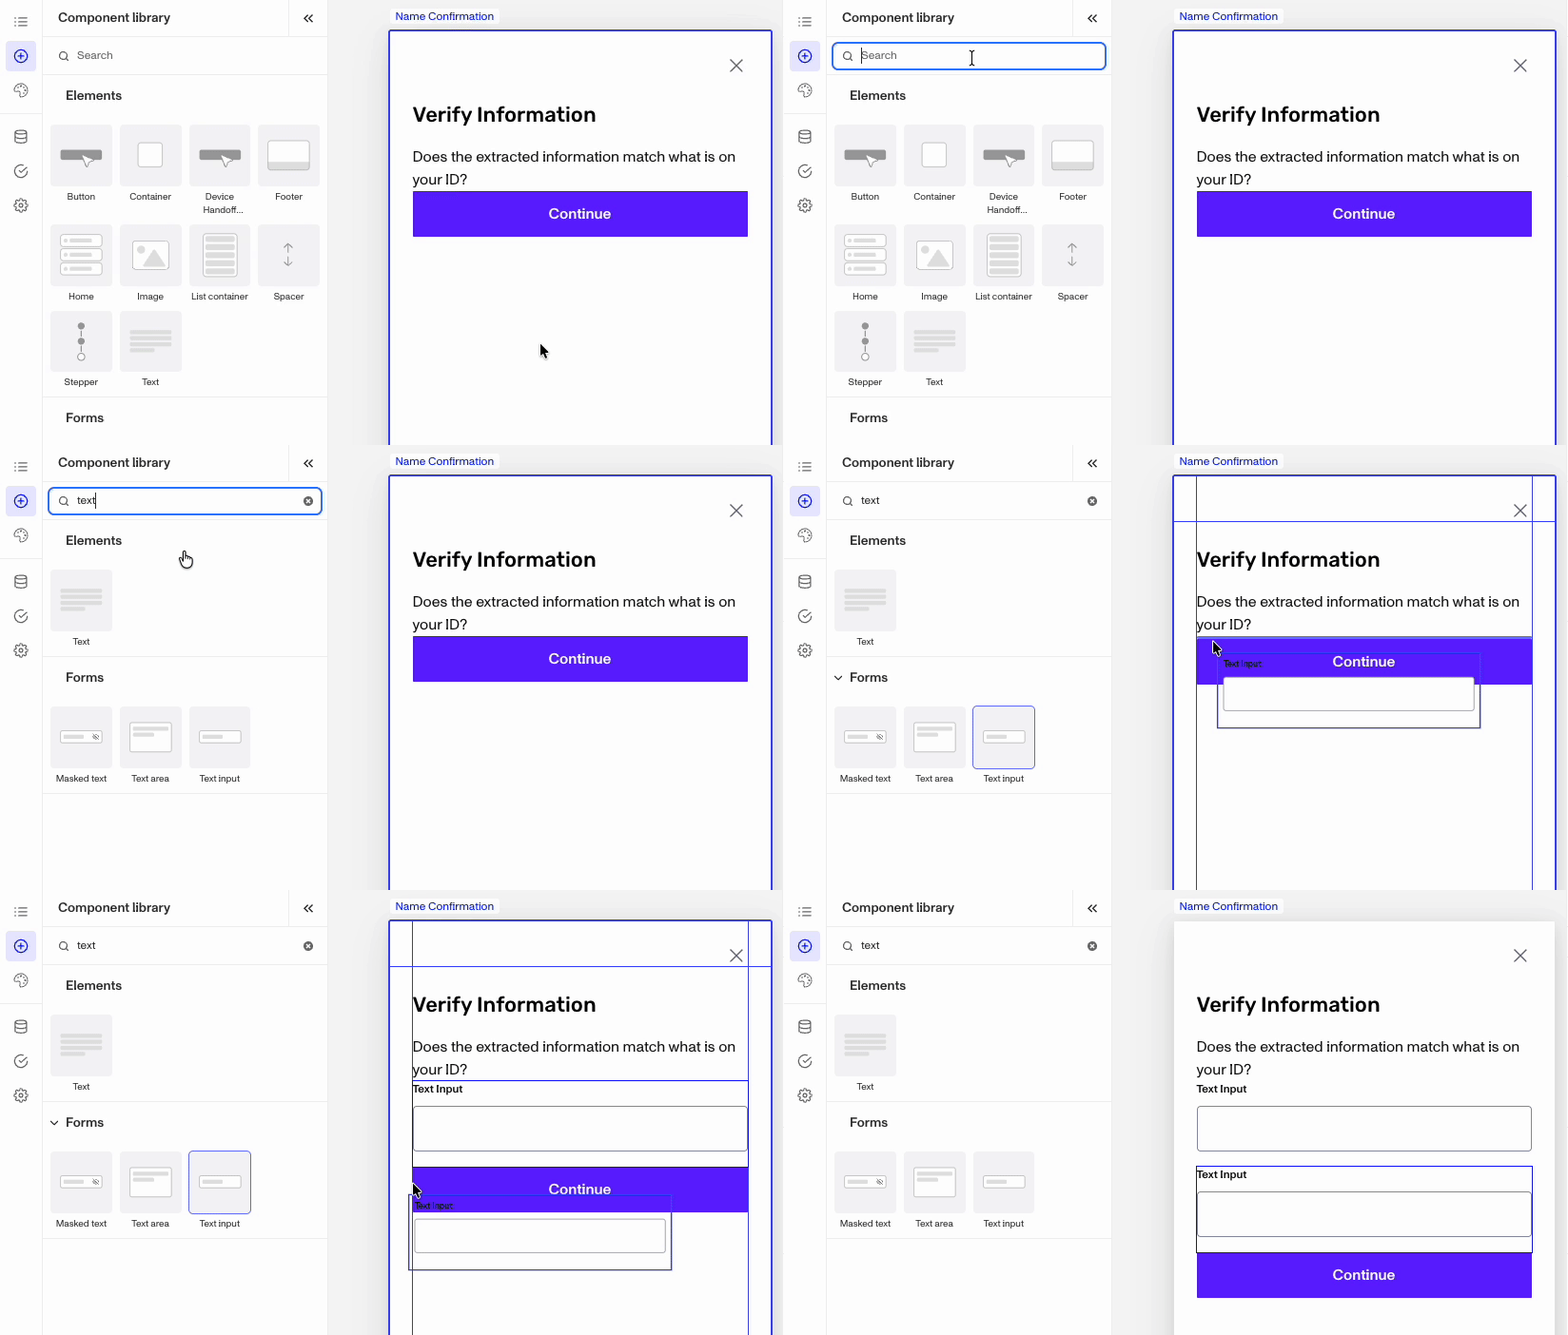
-
Select the top Text input. We’re going to modify it to display the extracted First Name. On the right in the Properties, scroll down to the Translations and update the Label from “Text Input” to “First Name”. Then edit the translations as we did previously.
-
Since we want this input to populate with data from the
name_firstfield, we next need to navigate to the Data tab on the right. For the Fields section, first set Required to No so we don’t force the end user to make any changes. Then we want to update the Field, via the drop down, to the existing field ofname_first.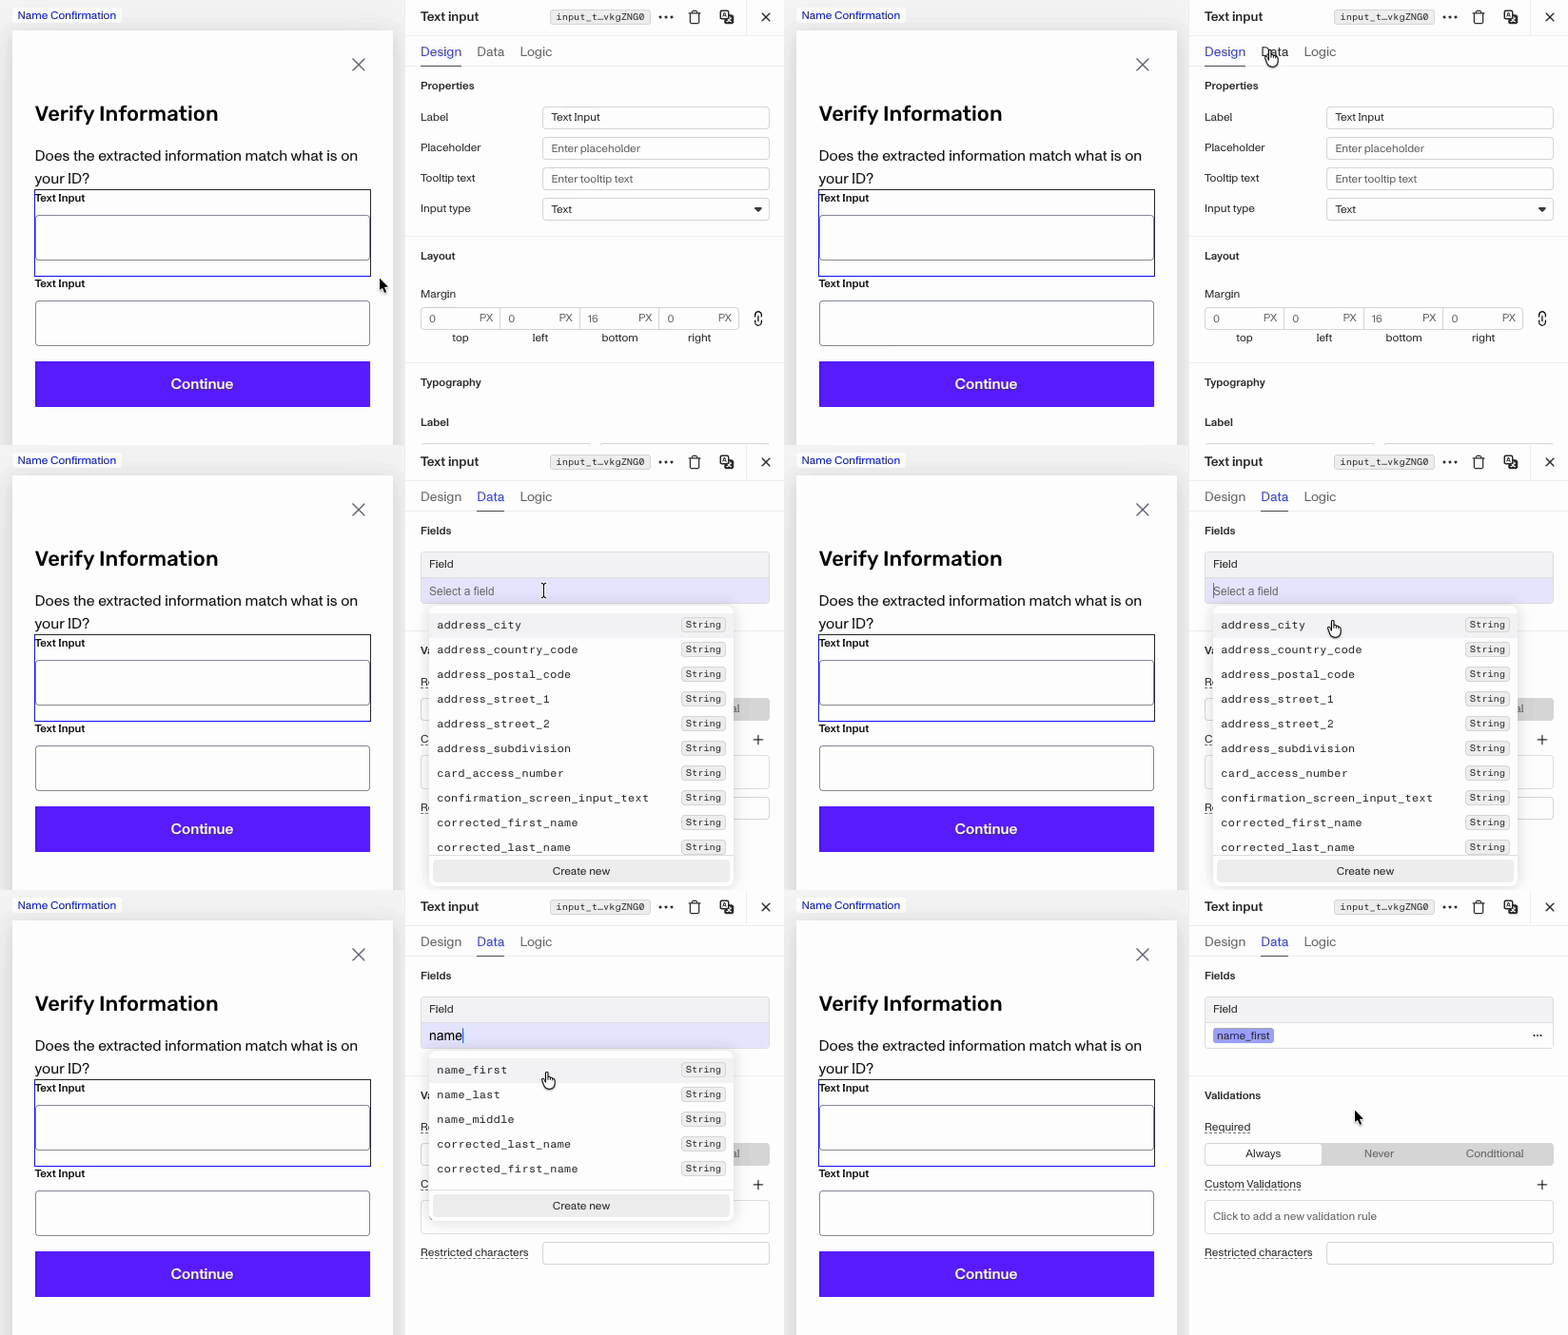
For the Logic section, you’ll want to disable the test component “On Screen Load”. Disabling the component keeps it and it’s content visible, but prevents the end user from editing it.
-
To set the logic rule for when to disable the component, click Logic tab. Under Logic rule, click the + icon to the right. Then in the Logic Rule screen, set the
whento the relevant field name and the operator tois not blank.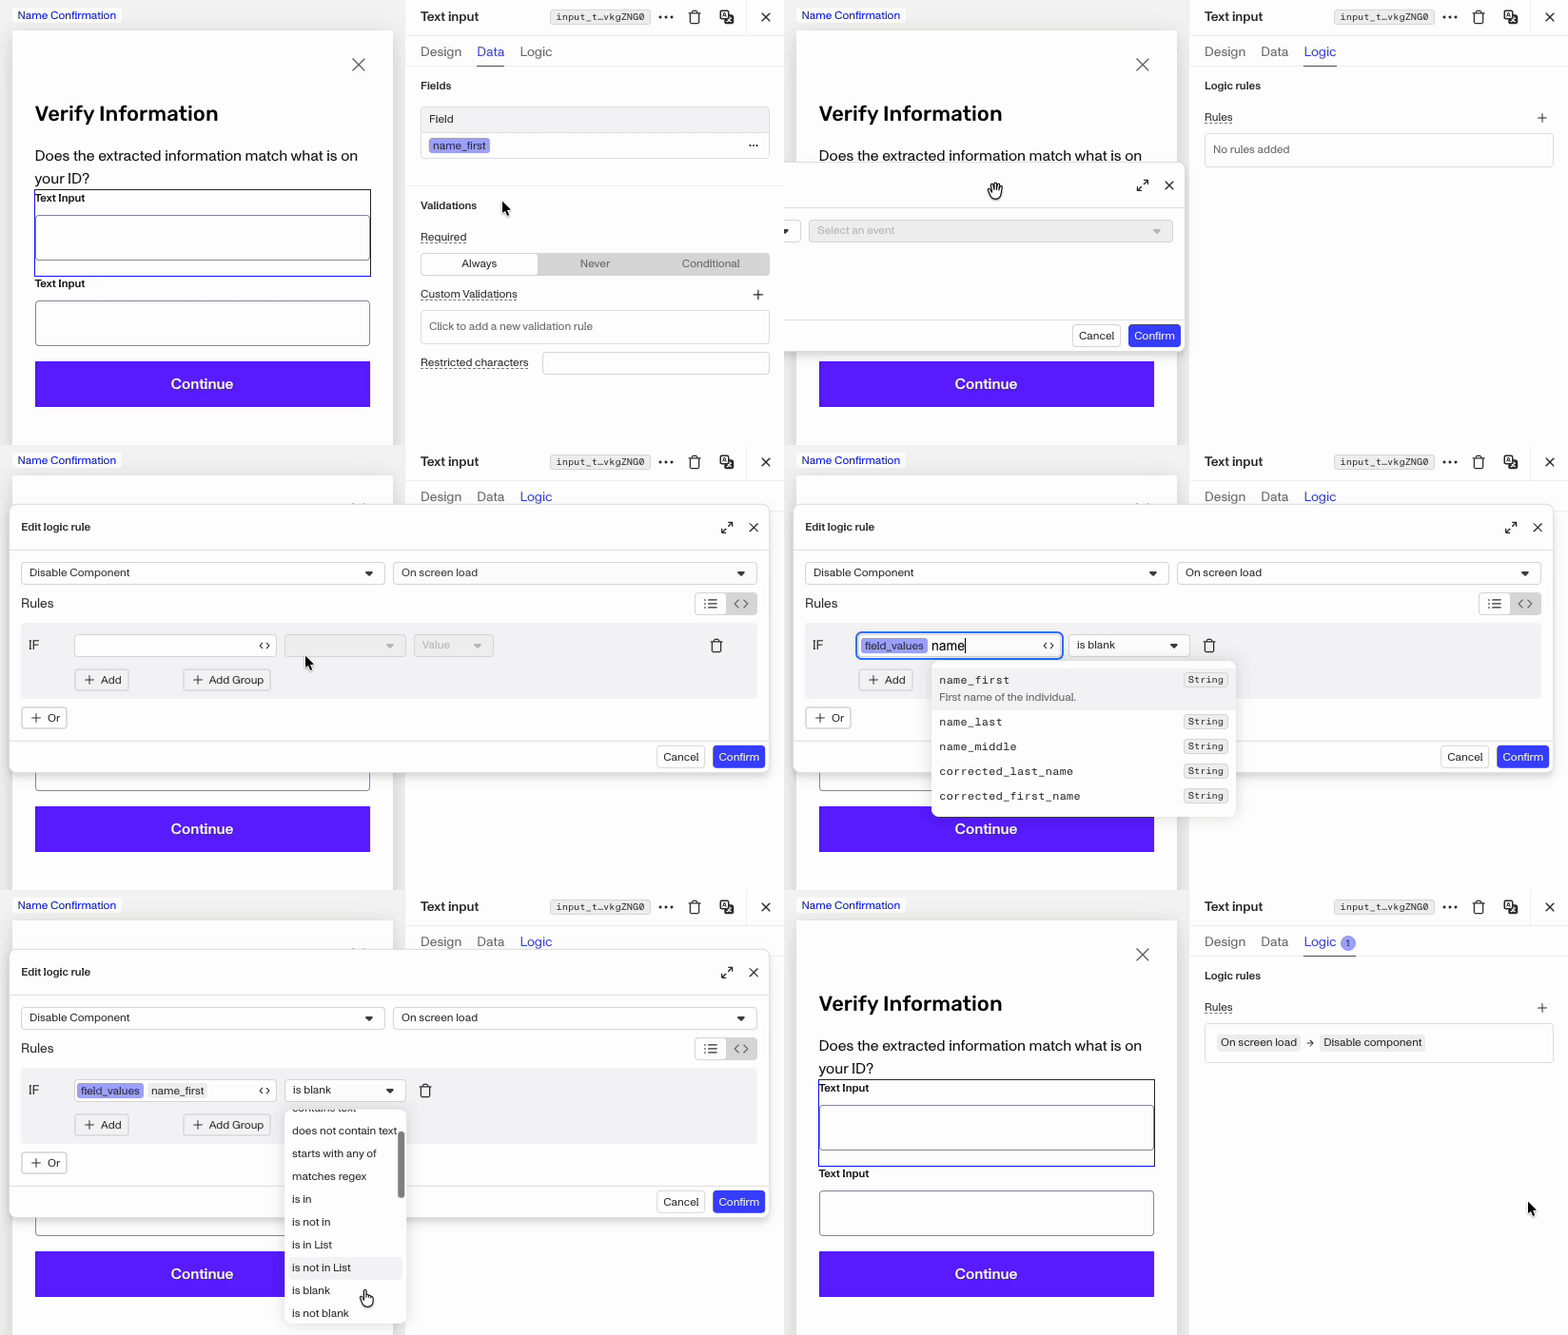
-
Repeat the same process for the second Text Input component, updating it’s Label, Required, Field, & Logic.
-
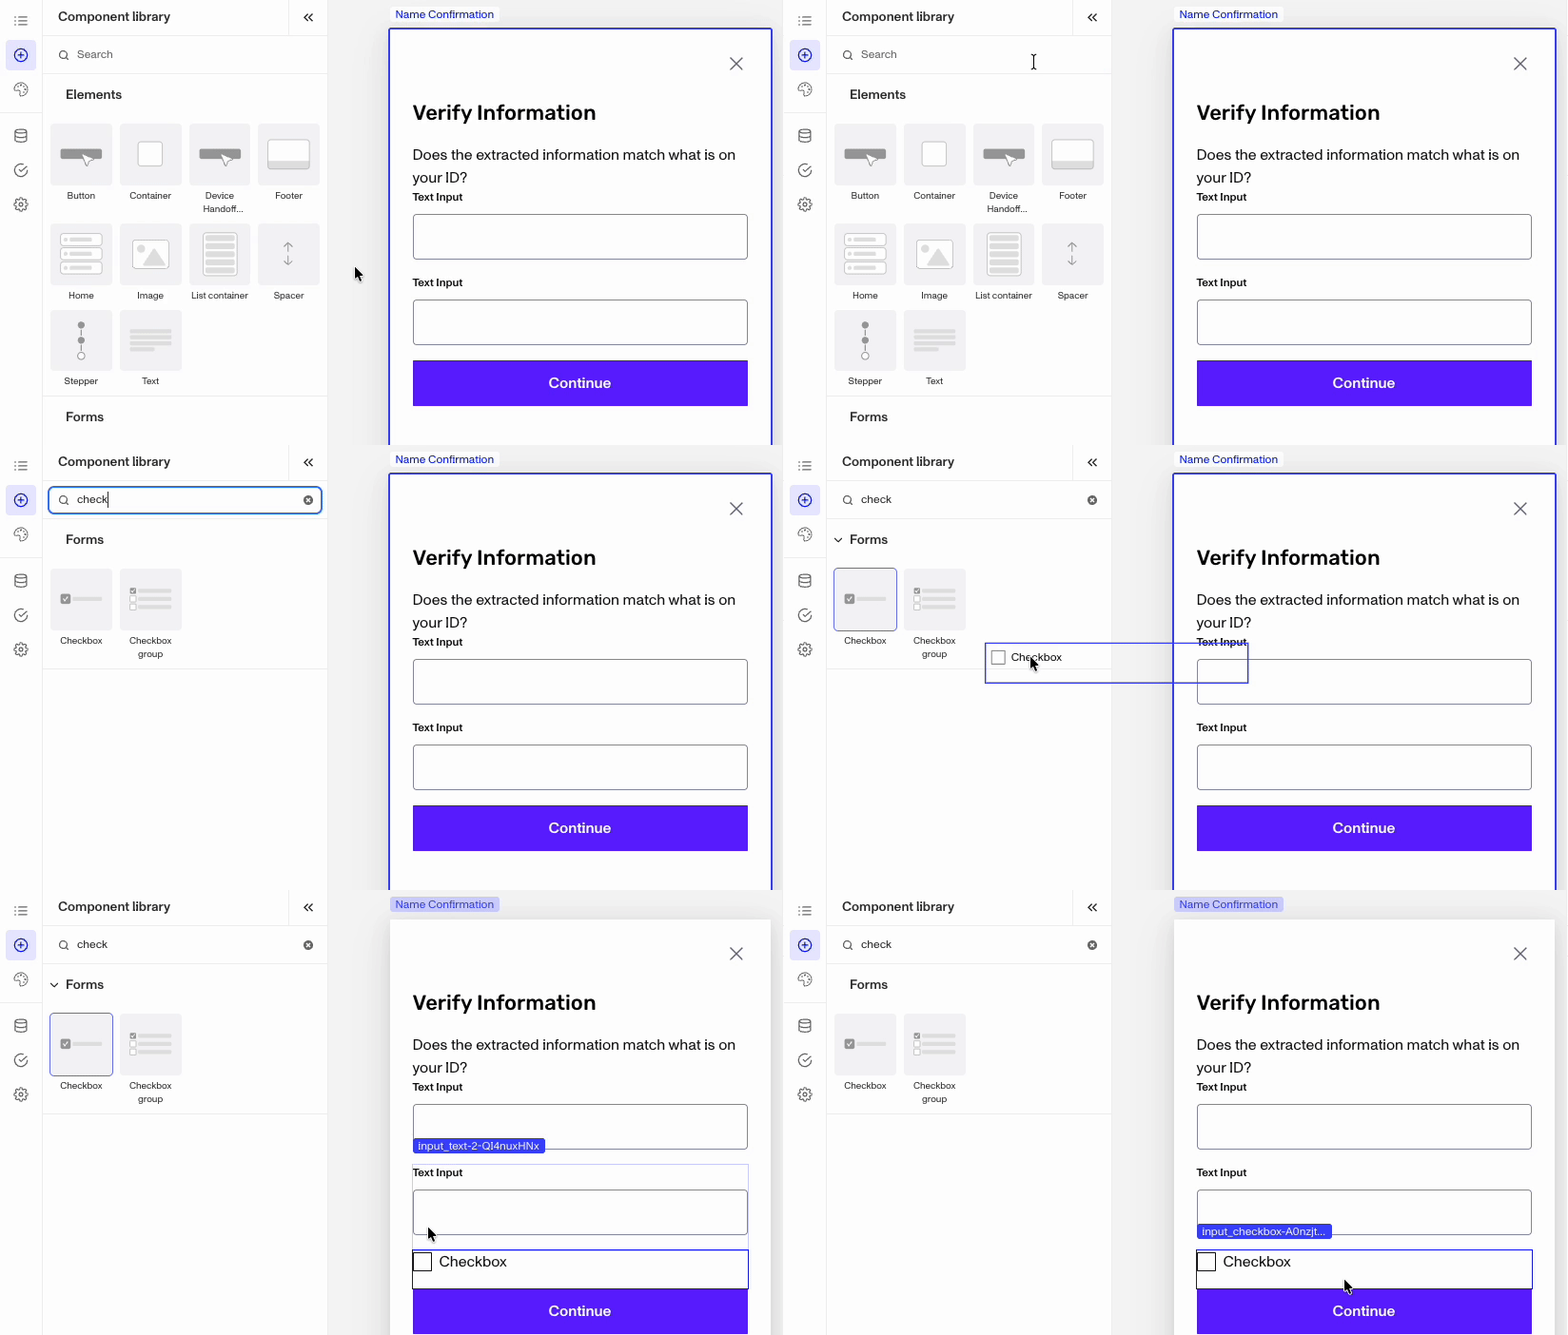
Since the end user needs to be able to respond to your prompt / question, we’ll next add a Checkbox component from the Forms section. Place it above the Continue Button.
-
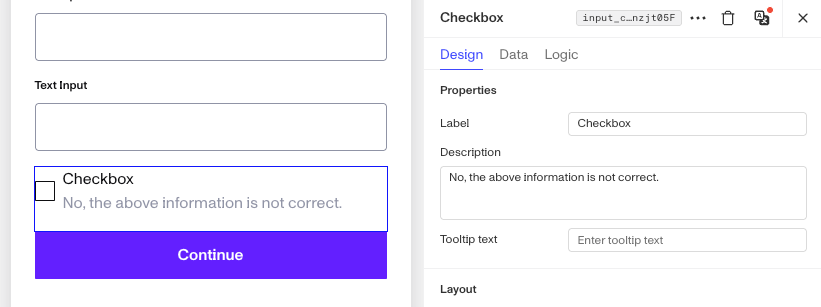
For clarity, you should update the checkbox’s label, under Properties, to specify what they are checking off. We can then build logic for other components on the screen and for after the inquiry.
-
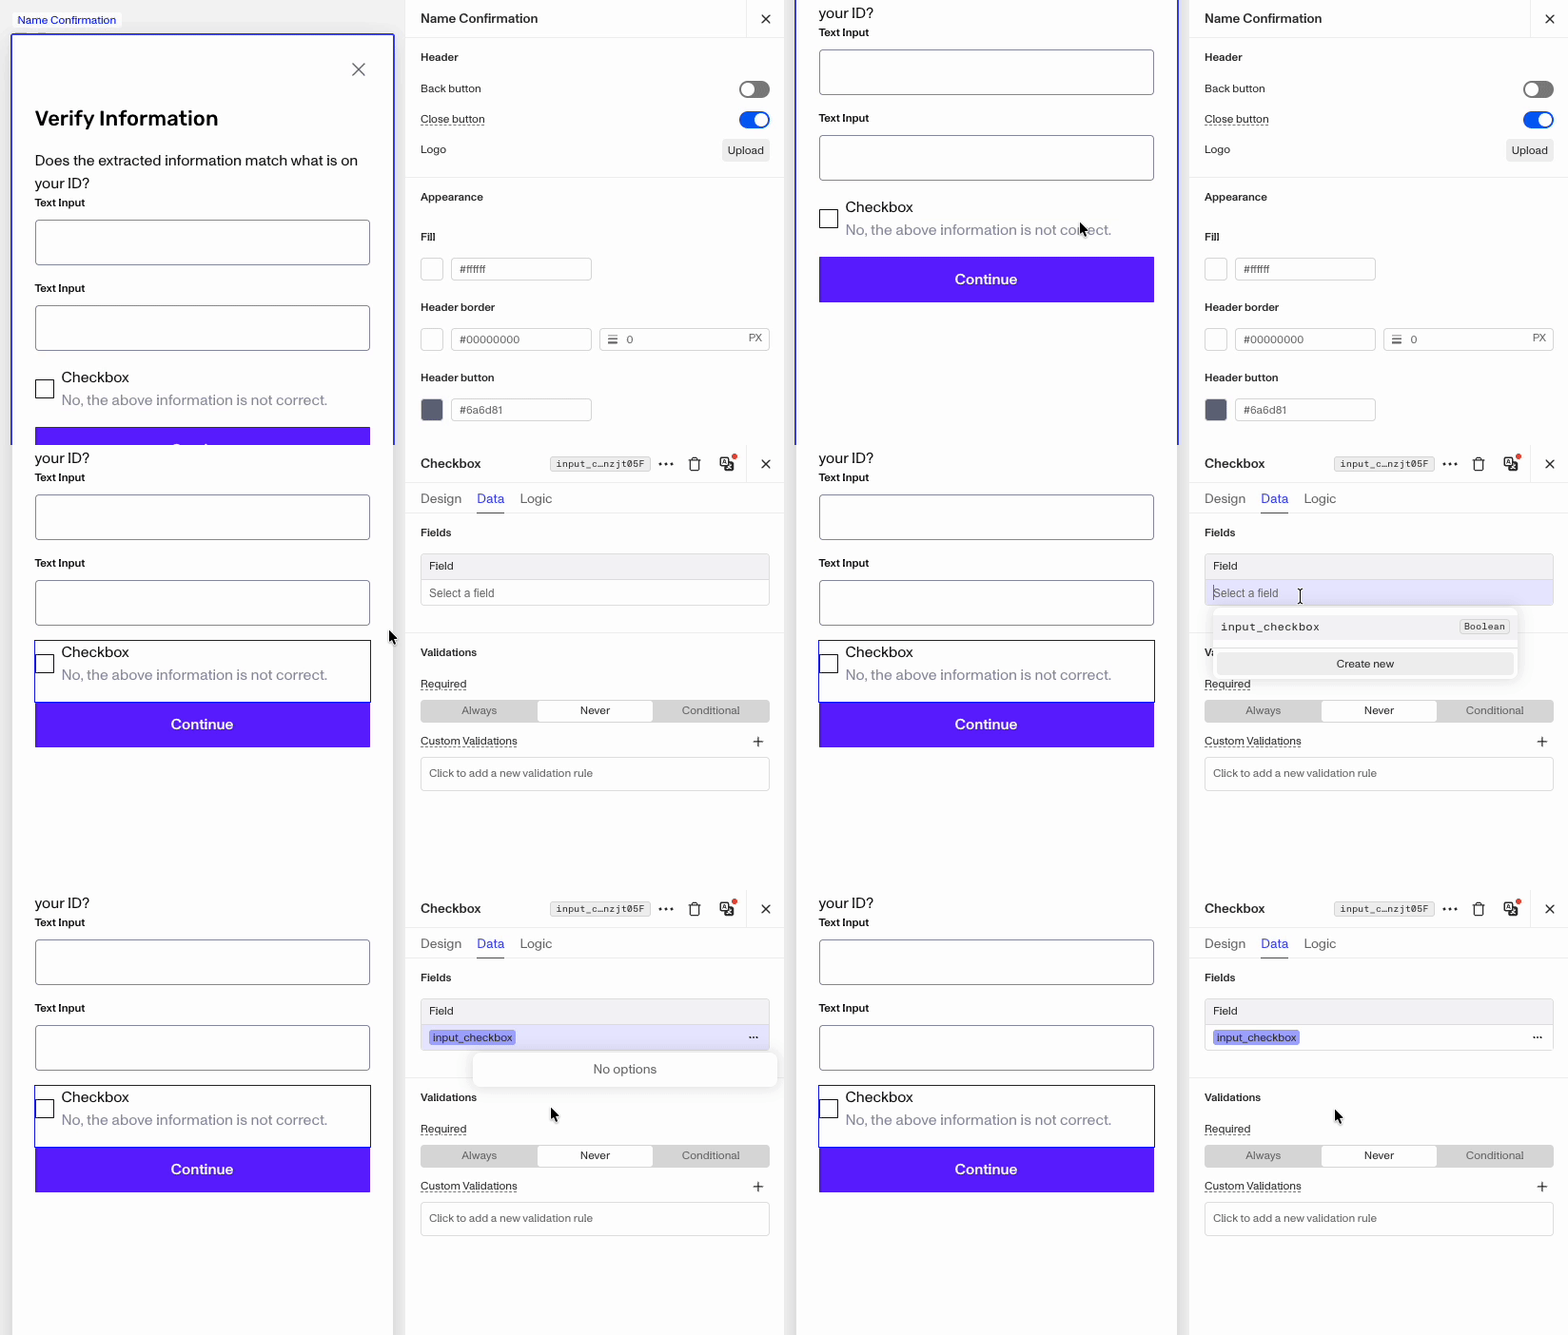
Since we want to reference if the Checkbox is toggled, you’ll need to give it an inquiry field to update. On the Data tab, click into the empty Field and select “input_checkbox”.
-
In the case that the information is incorrect and you want the end user to provide the correct names, we’ll next add two additional input fields, link them to new inquiry fields and make the input only appear when the checkbox is selected. Start by dragging out two new Text input components and placing them between the checkbox and the Continue button.
-
For the first Text input, update the Label to something like “Correct First Name”.
-
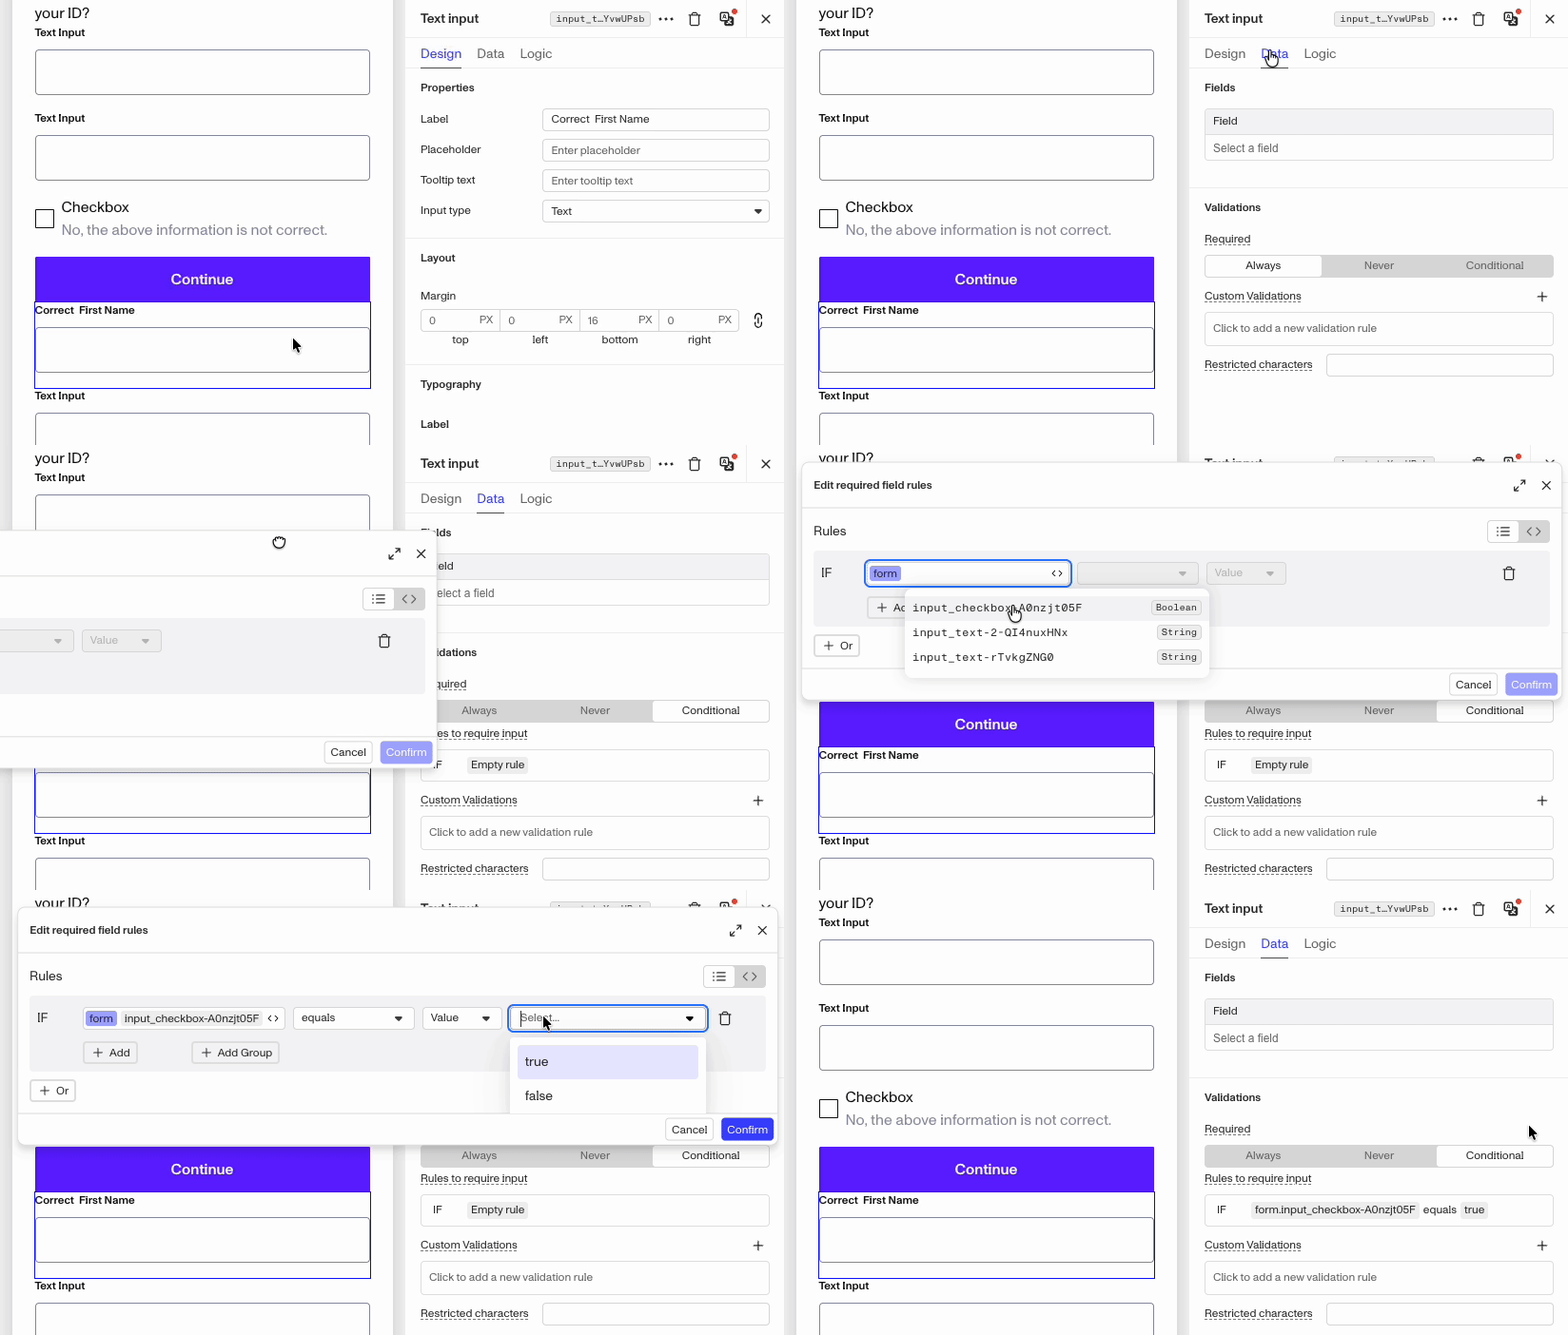
In the Data tab, we’re going to set Required to “Conditional” so that the input field is only required when the checkbox is toggled. Under Validations, switch from Always to Conditional. Then in the field below “Rules to require input”, click on the “Empty rule” to open the Logic Rule editor. Configure the rule as below:
-
Go to the Data tab, and click into the field. Click the “Create new” button at the bottom of the field list.
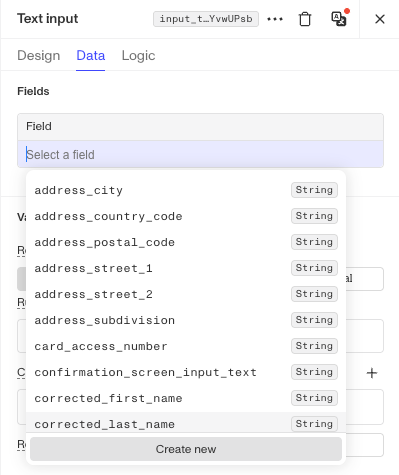
-
In the Create Field editor, enter a new field name like
CorrectFirstName. This is important as we don’t want to update the existingName Firstinquiry field with the extracted first name.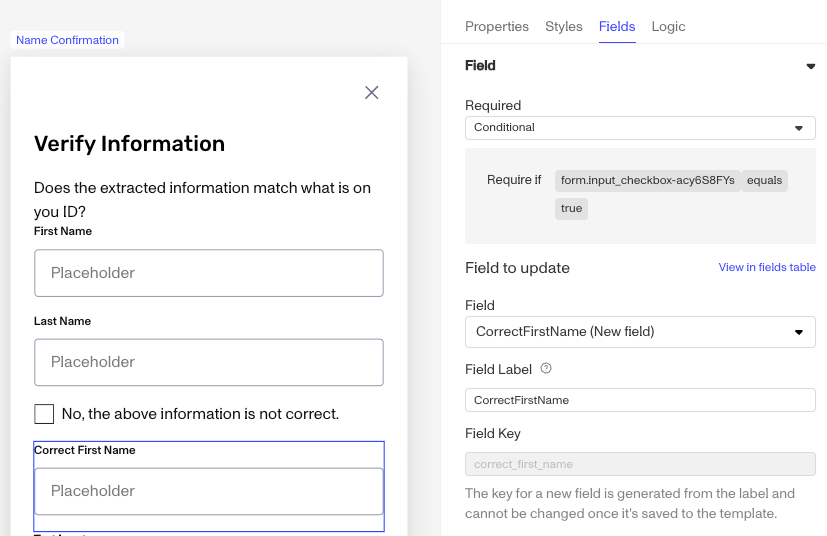
-
To start with this text component hidden, and then to reveal it after checking the checkbox, switch from the Data tab to Logic on the right. Click the + icon to the right of Rules or in the box below it.
-
In the Logic Rule editor, select “Hide Component” from the drop down. For the conditional set it to IF
input_checkboxisfalse.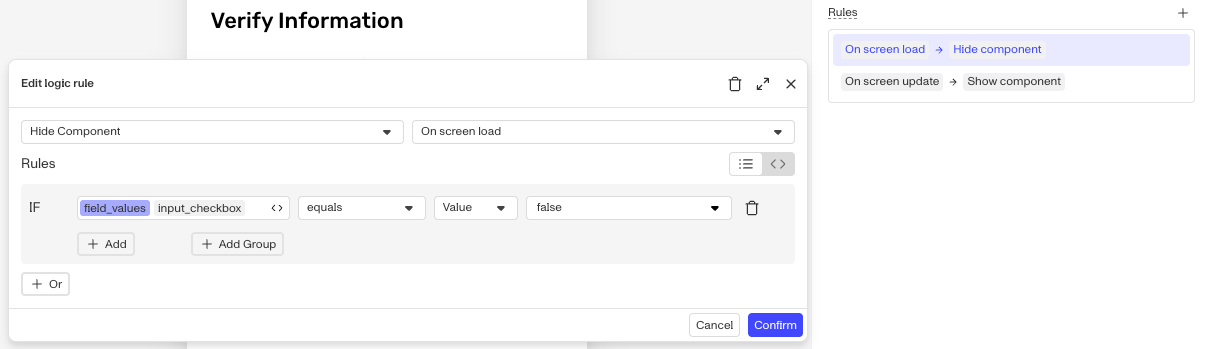
-
To make the Component appear when the checkbox is checked, we next need to create a rule to make it appear on screen update. Click the + icon to the right of Rules.
-
In the Logic Rule editor, select “Show Component” and “On screen update”.
-
For the Rule, select the
field_valuesobject. Then typeinto search forinput_checkbox. Then set the Value totrue.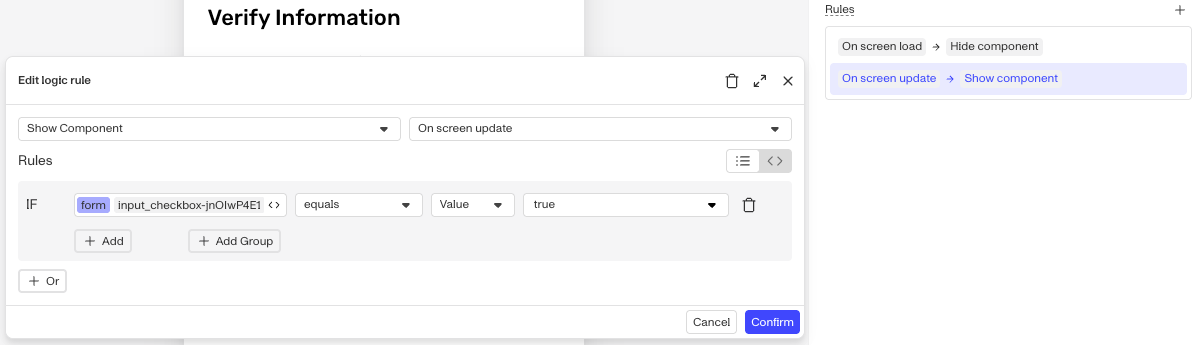
-
-
For the other Text input component for the Correct Last Name, repeat steps 15-24, making sure to switch the Label and Field to reference Last Name instead of First.
-
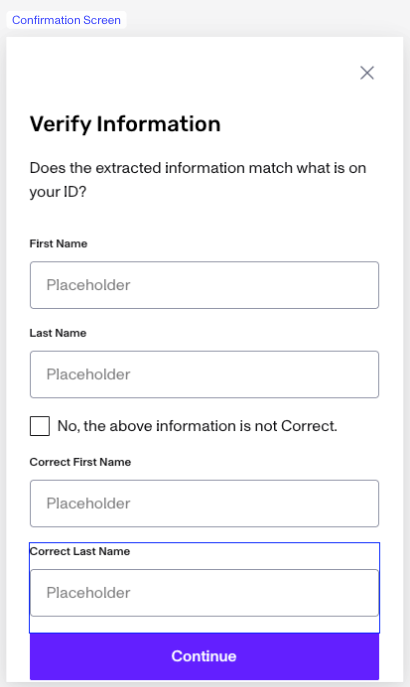
Within your screen editor your new screen should look like this:
-
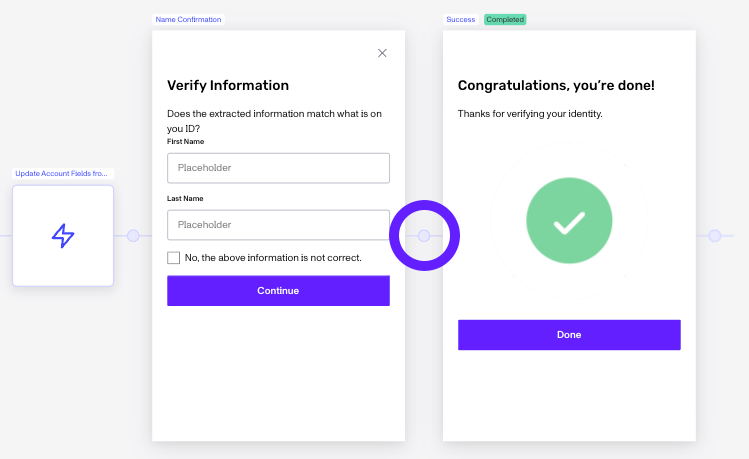
Nav back to the flow. Next we need to add some branching logic that will use that checkbox from the Confirmation screen and will Tag the inquiry. Click in the Node between the Name Confirmation screen and the Success screen.
-
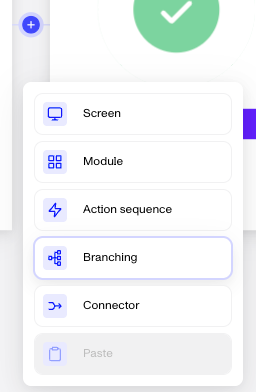
Select Branching. And then click into “Route 1”.
-
Rename route 1 to “Correct” or “Name Correct”. Set the logic to
trigger.fields.input_checkboxequalsfalse.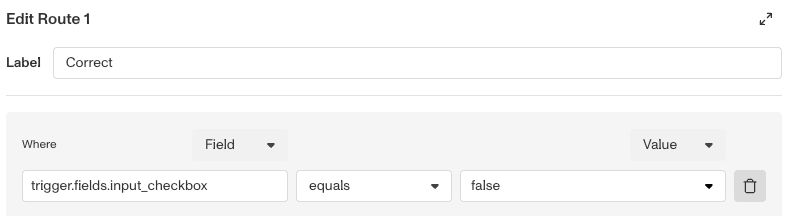
-
Along the
Elsebranch, click the Node to the right of it.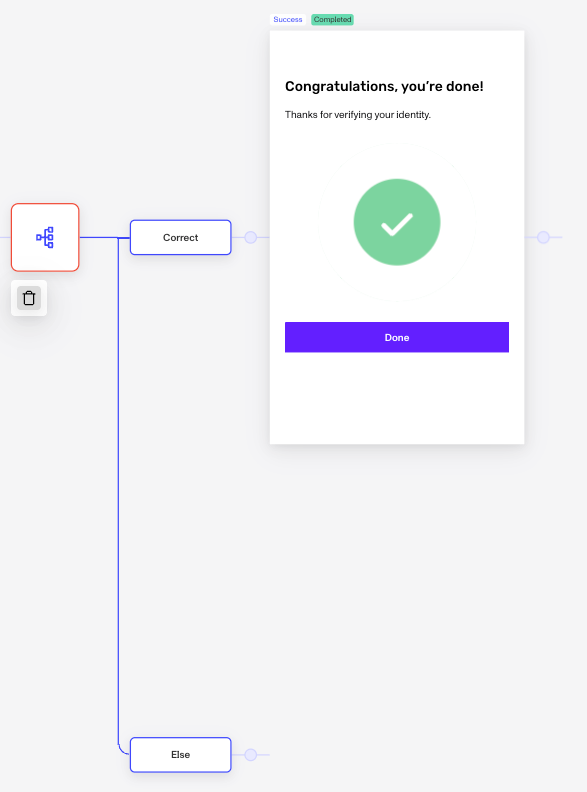
-
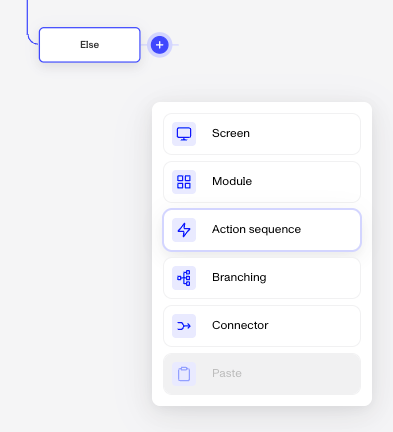
Select “Action Sequence”.
-
Click the edit icon on the Placeholder Action.
-
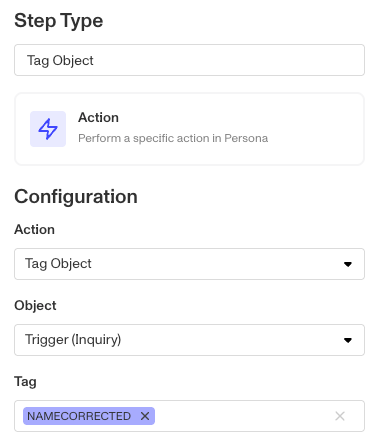
In the Action configuration, in the Action field type
Tag Object. -
You’ll then be prompted to select an existing Tag or create a new one. When creating new Tags make them descriptive like “NameCorrected”. Close the Action and nav back to the Flow.
-
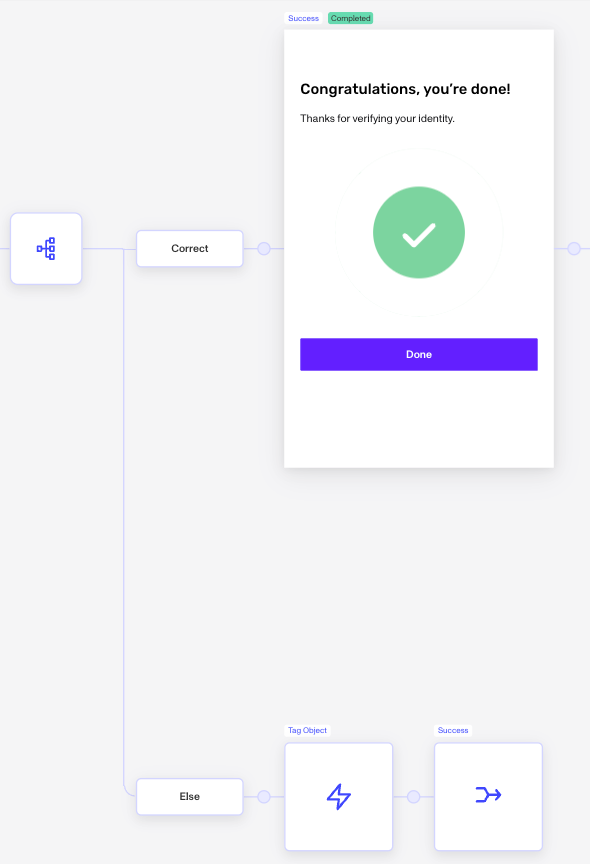
Click the node to the right of the Tag Object Step. Select Connector. Then Select the Success screen. Now this else branch will Tag the inquiry and then move to the Success screen to finish the Inquiry.
-
Save and Publish the Inquiry.
Testing with Preview
To ensure your template is providing the experience you want for your end users, you can switch to your Sandbox environment and Preview your inquiry flow.
Tagging for Manual Review with Workflows
After the inquiry is complete how can you efficiently process the inquiries with corrected names? With a workflow, you can create branch that checks for the Tag you applied to the Inquiry. Then within the branch, you can update the status of the inquiry from Completed to Needs Review. And if you have Cases enabled, you can create a case to help facilitate that manual review process.