
Overview
Removing a verification from an Inquiry template is more than deleting a single step. Each verification module inserts a cluster of related steps into your flow like capture screens, a verification step, a branching condition, and outcome paths, and all of them need to be removed together for the flow to remain valid.
This article walks you through identifying the full set of steps that belong to a verification and removing them cleanly, even when your template contains multiple verifications.
What gets added when you insert a verification module?
When you insert a verification module, Persona adds a pre-built group of steps to your flow. Knowing what’s in that group makes it easier to identify what to remove.
Government ID Verification module
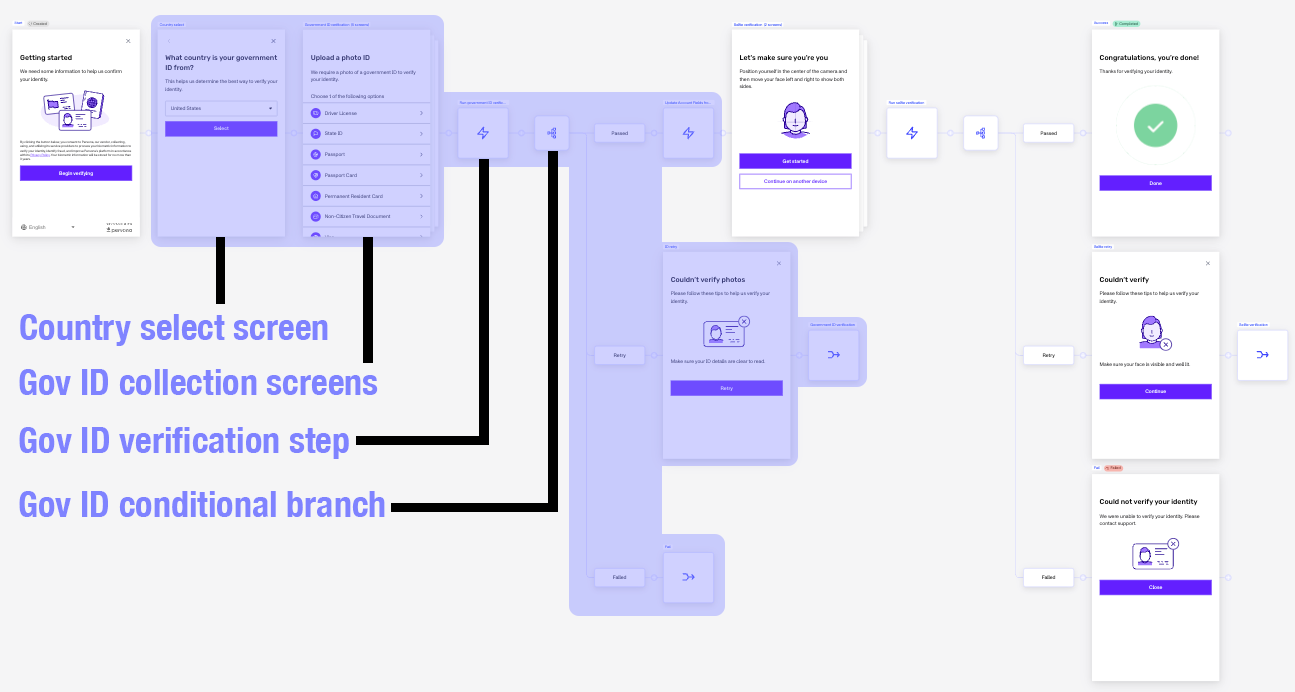
Inserting a Government ID Verification module adds:
- A start/intro screen
- A country select screen
- An ID type select screen (Driver’s License, Passport, National ID)
- A front capture screen
- A back capture screen
- A Government ID Verification step
- A branching condition with three paths: pass, retry, and fail
The retry path loops back to the capture screen and allows additional attempts. The number of retries is set in the branching condition.
Selfie Verification module
Inserting a Selfie Verification module adds:
- An intro/instructions screen
- A selfie capture screen
- A Selfie Verification step
- A branching condition with three paths: pass, retry, and fail
Database Verification module
Inserting a Database Verification module adds:
- A data collection form screen (collects name, birthdate, address, SSN)
- A Database Verification step
- A branching condition with two paths: pass and fail (no retry path)
After inserting a Database Verification module, you add a Standard Success and Standard Failed step separately. If you remove the module, you’ll also need to check whether those steps should be removed or re-connected to the remaining flow.
Other verification modules
Other verifications (AAMVA, Email, Phone Number, Document AI, etc.) follow the same pattern: one or more collection screens, a verification step, and a branching condition with outcome paths.
How to identify which steps belong to a specific verification
Templates with multiple verifications can have closely spaced branching paths and outcome screens that are difficult to distinguish at a glance. Use the following approaches to identify which steps belong to which verification.
Method 1: Trace from the verification step outward
- In the Flow Editor, locate the verification step. These appear as named nodes such as Government ID Verification, Selfie Verification, or Database Verification.
- Click the verification step to confirm its type in the right panel.
- Trace backward from the verification step to find the collection screens that feed into it.
- Trace forward from the verification step to find the branching condition and each of its outcome paths (pass, retry, fail).
All of these steps, the collection screens, the verification step itself, the branching condition, and the outcome paths, are the complete set for that verification.
Method 2: Check the branching condition label
Branching conditions inserted by a verification module are typically labeled by the verification type (for example, Government ID Verification Result or Selfie Verification Result). Clicking a branching condition in the Flow Editor shows its label and the field it’s evaluating, which helps you confirm which verification it belongs to.
Method 3: Use step display names
Steps inserted by a module inherit display names from the module. If you’ve renamed steps manually, check the step type in the right panel — the type label (for example, “Government ID Verification”) identifies the verification regardless of the display name.
Distinguishing between two verifications of the same type
If your template has two Government ID Verification steps (for example, a primary path and a step-up path), look at the flow structure:
- The branching condition immediately downstream of a verification step belongs to that verification.
- The collection screens immediately upstream of a verification step belong to that verification.
- Follow each branch’s outcome path to its next significant step (a screen, a success/fail node, or a transition) to understand where one verification’s scope ends and the next begins.
When in doubt, give each verification’s steps distinct display names in the Flow Editor before editing, so they’re easier to track.
Removing a verification and its related steps
Before making changes, create a draft of your template if you haven’t already. Changes to a published template require publishing a new version — working in a draft lets you preview and validate the updated flow before it goes live.
Once you’ve identified the steps that belong to the verification you want to remove, delete them in the following order to avoid leaving broken references in the flow.
Step 1: Disconnect the outcome paths
Before deleting any steps, look at the downstream connections from the branching condition’s outcome paths (pass, retry, fail). Some of these paths may connect to steps that are shared with the rest of the flow (for example, a common success screen used by multiple verifications).
- If an outcome path leads to a shared step you want to keep, note the connection — you’ll need to re-wire the upstream step after the removal.
- If an outcome path leads to a step that only belongs to this verification (for example, a verification-specific retry screen), that step is part of the set to remove.
Step 2: Remove the branching condition
- Click the branching condition in the Flow Editor.
- Click the trash icon or select Delete from the step’s options.
Removing the branching condition disconnects the verification step from its outcome paths.
For verifications like Government ID and Database, they include an Update Account action step within the Pass route of their conditional. This step will also be removed when you delete the conditional branch, so you don’t need to remove it yourself.
Step 3: Remove the verification step
- Click the verification step node.
- Click Delete.
Step 4: Remove the collection screens
Remove each screen that was collecting information for this verification — the capture screens, country select screen, ID type select screen, and any intro screens that were part of the module.
For each screen:
- Click the screen step in the Flow Editor.
- Click Delete.
Step 5: Re-connect the flow
After removing the verification cluster, the step upstream of where the verification started may have a broken connection. Re-connect it to the appropriate next step:
- Click the step immediately before the deleted cluster.
- In the right panel, update its Transition setting to point to the correct next step in your flow.
If that step uses an action sequence to route to the next screen, update the action sequence to remove or replace any routing logic that referenced the deleted verification steps.
Step 6: Validate and save
- Review the updated flow to confirm there are no broken connections (steps with no outgoing transition or dangling paths).
- Click Save in the top right.
- Publish the new version when the updated flow is ready.
Things to watch out for
Shared outcome screens. A single success or failure screen is sometimes used as the destination for multiple verifications. Deleting it as part of one verification removal will break the other. Always check whether an outcome screen is referenced by more than one branching condition before deleting it.
Action sequences that reference deleted steps. If your flow uses an action sequence to route between verifications (for example, a shared routing action that evaluates multiple verification results), removing one verification’s steps may leave stale references in the action sequence. Review the action sequence logic and remove or update any references to the deleted steps.
Retry loops. The retry path in a Government ID or Selfie Verification branching condition loops back to a capture screen. When you delete the branching condition, confirm the capture screen’s transition is also updated — otherwise the flow may still point from the capture screen to the now-deleted branching condition.
Multiple verifications of the same type in one template. If you have two Government ID Verification steps (for example, a primary flow and a step-up path), make sure you’re deleting the correct cluster. Use the identification methods above to confirm which steps belong to the verification you want to remove before making any changes.